I have been so preoccupied lately that I almost forgot to get in a Creative Cache for August. Every once in a while, I like to highlight an already established cache for the readers. A cache that is creative enough that it should be put on everyone's "Must Visit" list. For that, I'm going to take you out to Portland, OR, where a unique and fun cache exists. It's called...
Dr. Who
Now I'm going to warn you. You won't be getting details about how this cache is designed. It would totally ruin the experience for anyone planning on hitting this one.
The cache was placed by goblindust on 05/22/2006. Since then, it has racked up 594 finds and only six DNF's. That's pretty impressive. So what's so special about this cache? Plain and simple and it goes with this site. It's just plain creative. It will make you cringe when you first arrive on site to try and figure out where it's hidden. It will pop a light bulb when that idea comes to mind. And it will surprise you when you discover how it's hidden.
I found it with my buddy Webscouter. while we were traveling the Pacific Northwest during our Geowoodstock VIII trip. We had heard the name from several people and had planned on going through Portland anyway so we took the advice and visited it. We were happy we did.
So anyone traveling to Portland needs to add this to their list. Trust me. You'll be happy you stopped for this one.
TripCyclone
Showing posts with label small. Show all posts
Showing posts with label small. Show all posts
Monday, August 30, 2010
Saturday, July 31, 2010
Some Creative Supplies
Tonight, we are going to deviate a bit from our usual design post and talk a bit about some basic supplies you can equip yourself with that may become part of your regular cache design kit. Some of these supplies may be used more than others depending on how you design your caches, but all are useful. We'll start with supplies for the inside of your cache.
Interior Supplies
TripCyclone
Interior Supplies
- Baggies - these are wonderful tools for protecting a logsheet from moisture. Larger kitchen use baggies can be useful when placing a regular size cache, while smaller arts & crafts baggies are great for micro and small caches. The smaller ones can be found at any arts & crafts store, and usually in arts & crafts departments of stores like Wal-mart and Target. Just find the section where beads are found and you can find a variety of sizes in 50 and 100 quantity packages, often for $2 or less per set. A few bucks can supply you with enough baggies for plenty of potential caches. Carry them around with your regular caching supplies and you can help other cachers protect their logsheets as well, or replace damaged baggies.
- Writing utensil - not everyone likes to add a writing utensil to their caches, often because of the varying cache designs they might use. Consider picking up a package of golf pencils. Since they are smaller, the open up the range of cache sizes you can use them in. Plus, a writing utensil inside can be useful if a cacher forgets their own pen or pencil.
- Swag - this may not work for micro caches, but if their is room for swag, consider adding an item or two. What you use is entirely up to you. Dollar stores are invaluable resources as you can often by packages of items like toy soldiers, plastic coins, etc. Crafts stores are also useful, especially if you might be interested in making some personalized FTF swag. Party stores often care packages of cheap party favors for parents looking to make gift bags for their child's party. Toys often make great swag for kids. What should be avoided? Inappropriate or hazardous items, alcohol, food, liquids (what if something accidently breaks), and sharp objects or weapons, among other potentially bad swag ideas.
- Stash Notes - you can get these from various geocaching sites. They break down geocaching into an easy to understand explanation for muggles who might find the cache.
- Camo Tape - there are several varieties of camo tape that you can find, ranging from camo duct-tape to camo felt tape. They are all usually pretty good. Take any basic cache design and add camo tape to help reduce the visibility of a cache. Most stores that sell a variety of duck tape will sell camo tape right there. Otherwise, check sporting goods stores/departments to find some.
- Sharpie - this can be used to write something on the outside, like "Official Geocache, Do Not Remove" or a GC code.
- Geocache Label - unless you make them yourself, you can buy "Official Geocache" labels to apply to the outside of a geocache. These can be useful in case a muggle happens to find the cache. Great when combined with a Stash Note inside.
- Spray paint - this mostly applies to ammo cans. Try to have a can of spray paint, preferably a shade of Forest Green, to paint a recently purchase ammo can. This is done to cover up the military markings which might worry muggles if found.
TripCyclone
Thursday, June 3, 2010
Pet Caches
Blending caches in with the environment can be tricky and there are a lot of ways to do so. While camouflage can be very basic, to truly get it just right takes practice. But there is another fun way to do camouflage that we will look at today, along with several examples of this method. Because of the various methods used, it will be hard to provide a materials list that covers every possible method. So we will try to highlight what will be needed for each of the provided examples so you can get an idea about how to approach the method. And what is the method...
ANIMALS!
Yep, I said animals. So what exactly does that mean? Those of you who have found a lot of caches may have seen a cache built like this before. It a geocache built to look like an animal. In some cases, the animal part is a prop that has been turned into a geocache. Other times, it is a geocache that is attached to some kind of animal prop. And in some cases, the animal actually hides the container. We will look at one of each of these methods.
MATERIALS
One hard part about the methods we will be looking at is finding the right prop for the design. There are two easy places to find these items, though they aren't the only locations. One is a Garden Center. Many stores that cater to landscaping and gardening will often have some animal related props. Another location would be Halloween stores. While these are usually only found in early Fall, with a little bit of looking you can sometimes find stores that sell Halloween related goods year-round.
ANIMAL IS THE GEOCACHE
Our first example is an animal that has been turned into a geocache. In this example, the animal is typically a larger prop that is hollow in some form. Is this always the case...definitely not. I've seen examples of bison tubes made to look like insects. But for this post, we will focus on a larger version. For this example, you will need a few items:


To attach this the way it is shown, the person who hid this would have had to drill a small hole into the tree, then take a hook screw a bit larger than the hole and screw that into the tree as well. This would then provide the hook for the loop you see in the above photo, thereby attaching the cat to the tree as shown.
While this design is pretty cool when you see it in person, this did require putting a screw into a tree, which could cause damage to the tree. If you like how this is setup (and it was pretty cool when I saw it), I would encourage you to find a location that doesn't require drilling into a tree. I have seen reviewers archive caches that do this and they are right to do so. It may not seem like much, but this can cause damage.
As you can see in this image, the design does create an interesting atmosphere for a cache, especially on Halloween. I know I laughed pretty hard upon finding this because my first thought was that we had actually found a cat. Imagine the logs you would receive with a cache like this.
ANIMALS ATTACHED TO THE GEOCACHE
The next type of animal cache involves attaching animals to a geocache. One of the first examples of this that I ran into involved a fake rat attached to a 35mm film canister, hidden under a log. I happened to go after it at night, which made the cache even more fun to find. These types of hides are rather simple and require nothing more than a geocache and some kind of fake animal to attach to the outside. Spiders, snakes, and rats are the most common fake animals you'll see used, but insects often work wonderfully as well.
When building a cache like this using a smaller cache size, you typically need nothing more than the geocache itself, the animal to attach, and a method for attaching it. Weather resistant glue is the most commonly used method. For larger caches, like ammo cans, some geocachers will use items like snakes and large spiders and just rest them on top of the cache.
Here is an example of a micro attached to an insect. The photo was taken by rhondapalooza.

ANIMALS HIDING GEOCACHES
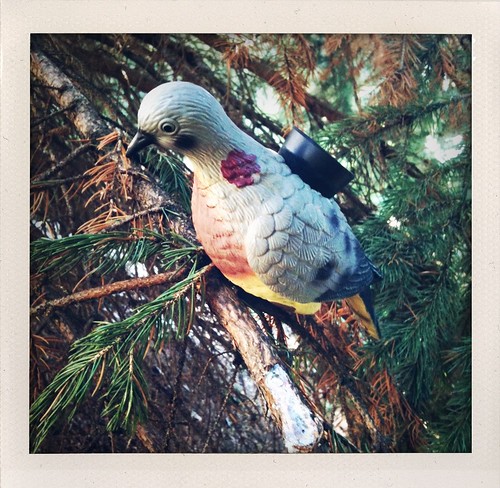
The last example involves using an animal to hide the geocache. Now the above example of the cat might seem like it fits here to but there is a difference. With the cat, the cat was turned into the geocache. The PVC parts merely provided an easy method to open and close the container, but the cat's body was the geocache itself. For this last method, the fake animal isn't the geocache itself, it's merely the camouflage designed to hide the geocache. Here, let's see an example of this:
 In this example, the bird is the camo. If you look closely, you can see the red, rounded edge of the geocache sticking out the back end of the bird. It is hard to tell from this view, but the bird is actually carved from a lightweight wood, carefully painted to look like a real bird. Using a drill, a hole was created for the bison tube. A perch was created and tied to the tree on which the bird is attached. Look carefully and you can see a triangular piece on the back end of the perch which helps prevent the bison tube from falling out accidentally. To retrieve this cache, the bird rotated forward just a bit. This was achieved by making the feet loop around the perch, but with a little bit of looseness to allow the rotation. Rotate the bird forward, pull out the bison tube, and sign the logsheet.
Birds are definitely the most commonly used animal for this method, at least from what I've experienced. Here is another example of a bird geocache (which happens to be an exact replica to two bird caches I have seen) as taken by Wrapped In Piano Strings, who we should welcome to the geocaching world as this is a picture of their very first find:
Once, I saw alarge GINORMOUS Bison using this method up in St. Joseph, MO. Always good for a laugh when taking someone to find it.
So there you have it. Three ways to turn a simple geocache into a creative geocache using animals. Have you seen an example of this before? Post a GC code in the comments.
TripCyclone
P.S. I am waiting for permission from a few people to display their photos on the site. I will update the post with photos as permissions arrive. For now, I've merely linked to the photos I am awaiting permission from.
ANIMALS!
Yep, I said animals. So what exactly does that mean? Those of you who have found a lot of caches may have seen a cache built like this before. It a geocache built to look like an animal. In some cases, the animal part is a prop that has been turned into a geocache. Other times, it is a geocache that is attached to some kind of animal prop. And in some cases, the animal actually hides the container. We will look at one of each of these methods.
MATERIALS
One hard part about the methods we will be looking at is finding the right prop for the design. There are two easy places to find these items, though they aren't the only locations. One is a Garden Center. Many stores that cater to landscaping and gardening will often have some animal related props. Another location would be Halloween stores. While these are usually only found in early Fall, with a little bit of looking you can sometimes find stores that sell Halloween related goods year-round.
ANIMAL IS THE GEOCACHE
Our first example is an animal that has been turned into a geocache. In this example, the animal is typically a larger prop that is hollow in some form. Is this always the case...definitely not. I've seen examples of bison tubes made to look like insects. But for this post, we will focus on a larger version. For this example, you will need a few items:
- A fake cat
- Logsheet
- Weather resistant glue
- PVC Plug and respectively sized threaded PVC adaptor

You can see the cat, along with the black PVC fitting attached to it's belly. A hole was cut into the belly, cut to the diameter of the bottom of the PVC Cleanout. The cleanout is then glued to the cat. The PVC Plug then can screw into the cleanout to create a water-tight seal (provided you've properly glued the cat to the PVC). In this photo, you might also notice a small metal loop in front of the PVC plug. This loop was used to attach the cat to a tree, as seen here:

To attach this the way it is shown, the person who hid this would have had to drill a small hole into the tree, then take a hook screw a bit larger than the hole and screw that into the tree as well. This would then provide the hook for the loop you see in the above photo, thereby attaching the cat to the tree as shown.
While this design is pretty cool when you see it in person, this did require putting a screw into a tree, which could cause damage to the tree. If you like how this is setup (and it was pretty cool when I saw it), I would encourage you to find a location that doesn't require drilling into a tree. I have seen reviewers archive caches that do this and they are right to do so. It may not seem like much, but this can cause damage.
As you can see in this image, the design does create an interesting atmosphere for a cache, especially on Halloween. I know I laughed pretty hard upon finding this because my first thought was that we had actually found a cat. Imagine the logs you would receive with a cache like this.
ANIMALS ATTACHED TO THE GEOCACHE
The next type of animal cache involves attaching animals to a geocache. One of the first examples of this that I ran into involved a fake rat attached to a 35mm film canister, hidden under a log. I happened to go after it at night, which made the cache even more fun to find. These types of hides are rather simple and require nothing more than a geocache and some kind of fake animal to attach to the outside. Spiders, snakes, and rats are the most common fake animals you'll see used, but insects often work wonderfully as well.
When building a cache like this using a smaller cache size, you typically need nothing more than the geocache itself, the animal to attach, and a method for attaching it. Weather resistant glue is the most commonly used method. For larger caches, like ammo cans, some geocachers will use items like snakes and large spiders and just rest them on top of the cache.
Here is an example of a micro attached to an insect. The photo was taken by rhondapalooza.
ANIMALS HIDING GEOCACHES
The last example involves using an animal to hide the geocache. Now the above example of the cat might seem like it fits here to but there is a difference. With the cat, the cat was turned into the geocache. The PVC parts merely provided an easy method to open and close the container, but the cat's body was the geocache itself. For this last method, the fake animal isn't the geocache itself, it's merely the camouflage designed to hide the geocache. Here, let's see an example of this:

Birds are definitely the most commonly used animal for this method, at least from what I've experienced. Here is another example of a bird geocache (which happens to be an exact replica to two bird caches I have seen) as taken by Wrapped In Piano Strings, who we should welcome to the geocaching world as this is a picture of their very first find:
Once, I saw a
So there you have it. Three ways to turn a simple geocache into a creative geocache using animals. Have you seen an example of this before? Post a GC code in the comments.
TripCyclone
P.S. I am waiting for permission from a few people to display their photos on the site. I will update the post with photos as permissions arrive. For now, I've merely linked to the photos I am awaiting permission from.
Thursday, May 6, 2010
Building a Pict-O-Cache
Disclaimer: This is an edited version of a post I made on my personal geocaching blog. I was getting ready to write about this when I realized I had already done it a long time ago. I've made a few updates.
If there was ever a cache that everyone should try once, pict-o-caches would likely be near the top of the list. They take aspects of several different types of caches and join them together to make a cache that everyone can participate in and enjoy. But how do they work? First, we need to establish what they are.
Pict-o-caches are a class on their own. Taking cues from multi-caches, on-site puzzles, and visual puzzles, these puzzles definitely require an observant eye. Given a location to start at, you are basically guided through a multi-cache not by finding hidden stages with coordinates inside, but by finding things right out in the open. The clues are pictures. Follow the pictures and find the cache. It sounds simple enough.
Let's look a bit closer. There are two basic methods of doing a pict-o-cache. For the first one, we'll use a pict-o-cache that I completed in 2008 with my friend 8601Delphinium. Both of us enjoyed this cache and thought it was a good example of this method. It is the Hastings Pict-O-Cache located in Hastings, NE, set up by Still Searching. In this method, you are given a starting location, usually the cache coordinates themselves. Standing in that location, you have to scan around the area. Somewhere, within your field of view, you would find this:
 Obviously, this image shows a brick wall, so you would want to scan for brick buildings. It could be on a building near to you or one in the distance, but it will be in your view. One thing to consider is whether the object is close to the ground or not. If you find a building in your view that has other objects masking it, like vehicles, bushes, or trees, you'll need to take that into consideration. Once you find the object in the picture, you need to go over to it. Stand next to it, and begin searching for picture number two:
 Examining the photo, you at least now that it is near a window. Second, you can also guess that it is at least a second story window based on the ledge. Third, even though it also appears to be on a brick building, don't assume that it is the same building. So make sure to scan every building in your view. Okay, over there. That's the window. Let's move over to it. Time to find number three:
 Now, you can be certain that this is the corner of a building, and along the roof. Again, start scanning around, this time paying attention to roof corners that have this style of decoration on it. Wait...over there. Nope, it doesn't have the streetlamp object visible along the edge of the photo. But, if you look at that other corner of the same building, it does have it. Time to go to stage four.
This is the overall idea of this type of pict-o-cache. It's nothing more than following the pictures. These caches are great caches for group caching or family caching. Everyone can get involved with finding the images, including kids.
But I said that the above method is just one type of this style of puzzle cache. So what's the other method? For the other method, I'll use Krypto Kache, found in Omaha, NE. Set up by Team Kryptos, this one still has you looking for pictures, but this time you are given a list of coordinates for the pictures. This might seem counter-intuitive, but it's not. The coordinates are just a list of coordinates with letters assigned to them, and the pictures are numbered. Go to each of the coordinates and figure out which of the photos is found there. Match each coordinate to a picture and you'll get numbers for the letters. Then fill in the numbers in the provided final coordinates based on the letters and you'll get the final location for the puzzle. Go to that location and find the cache.
Either method provides an interesting caching experience. But, what if you want to make one? Before you do anything, you'll need a few things.
Materials Needed:
A notebook? That seems odd. However I would also recommend bringing a notebook to help keep track of note only the order of the photos, but to match the photos to coordinates and to write notes about the photos. Both of those last two will make sense in a bit. For a cache container, any size can be used. Just remember to make it appropriate for the location you use. Ammo can's are obviously not the way to go if this cache will be designed in an urban area. And regarding the photo software. Anything will work. GIMP is a good free software. It has a learning curve, but there are plenty of tutorials out there to help and it is quite powerful considering it is free.
For the first method, there's a bit more that goes into preparing this puzzle. Start by finding a place to hide the cache (and mark the coordinates). Many of the pict-o-caches I've seen are usually found in vibrant urban environments. Urban areas provide a lot of different options for photos that you just won't find elsewhere. Whether using architecture, window, window displays, vents, signs, lamps, etc., you should have a pluthra of objects to use for photos. "Historic Downtown" areas often make great spots. Out in a park, on the other hand, is not so great. You have trees, bushes, plants, trees, benches, lamps, trees...imagine looking at a photo of a tree then looking around you to find a hundred trees that all look like the photo. Case settled. However, that doesn't mean a park can never work for this type of cache, it's just harder to make it work.
Once you find a location, you have two options. You can find a random starting location and work your way along a path to the final location, taking pictures along the way. Or you can do the same thing, only working backwards through the route. Either way works, but it might be easier to visualize if you work your way forwards through the route. I'll describe the rest as if you are doing it forwards.
Find a random starting location and grab the coordinates. Then, scan around and find something to take a photo of. Remember, your path can be whatever you want, so don't feel like you have to always be getting closer to the final location. Also, your photo can be at a distance, or it can be closer to the object you want to photograph. Feel free to mix it up to increase the difficulty, just make sure that what you see in the photograph is at least big enough to see from the previous spot. Another way to increase the difficulty is use only a portion of the photo. For example, instead of using a photo of the entire statue, crop it so that you only see a small portion of it. This also helps to reduce the chances that someone spots stage nine and rushes straight to that spot in the puzzle before they've done stages one through eight. This is where the notebook can really come in handy, as you can write down notes about each image in case you want to mess with the images on the computer.
Once you have your photograph, move to whatever you took a photo of and stand next to it. Before you continue, make sure to grab coordinates. You will want to add waypoints for each picture when you list your cache online. This helps the reviewer in two ways. One way is to help them see what route you are having the cacher go. They may see something you hadn't thought of based on where those stages are that may require fixing. Second, each picture is techniqually a stage in a multi-cache. Multi-cache guidelines require posting the waypoints for each stage. Some reviewers may see it as a puzzle cache and not require the additional waypoints, but trust me that it will be appreciated. Some reviewers will actually require them for the above reasons.
After you have your coordinates, repeat the above process until you reach the final location. When you close in on the final location, think carefully about the last two photos. The last photo should be close enough to narrow down where the final location is within 10 - 20 feet (or about the typical accuracy of your GPSr). The second to last photo should get you close enough that the last photo makes sense. If the final location is hidden in the skirt of lamp post, and your final location is of the skirt, the second to last photo should not have eight lamp posts in the image. Figure out a way to narrow it down to no more than two, maybe three if they are closer together. You'll get complaints from cachers if you don't.
Now that you have all your photos, coordinates for each photo, and have placed the hide, you're ready to go home. At home, you'll need to take some time to get everything organized. Hopefully, you took notes of the coordinates for each photo and a description so that you can quickly match things up. Load up your images and start preparing them. I recommend numbering your final images so that you can get them arranged properly. Feel free to put a visible number in the photo to help the cachers as well. If they are printing off a sheet of images then the numbers will help them keep everything in order too. Once you do have them prepared, you'll need to do one more thing.
When you post this online, you'll have an easier time displaying the photos if you create an image file that has the photos arranged in order that can be displayed online. Check out both of the linked caches listed earlier to see examples of this. It will make setting up the cache page easier. Also, don't forget to create additional waypoints for each image. They can be hidden from public view if using the "follow the images" method, or they can be public if using the "match the images" method (you have to list the coordinates anyway for this one). Get everything ready to go and submit. As to the software to use for this, that may vary depending on your experience. This isn't needed, but it makes creating the cache page easier.
But what about that second method I described. You know, the one where you match the photos to the coordinates? This method has a bit wider range of options for where you can set it up as compared to the first method because you aren't following images to the hide, but matching images to get numbers in order to determine the final coordinates. Your images can be in a confined area of a few blocks or they can be spread out over a mile wide area. I've seen some spread out across entire communities. You just need to keep track of which images go with which coordinates. Find some locations with something you want to take a photo of and take several photos of varying zoom levels. You can also crop those as you see fit. Make sure you take coordinates of the spot you took the photo from. If using the notebook, take note of which coordinates go with which image. Keep doing this for the number of photos you want to use, then find somewhere to place the final cache.
Once you get home, make sure the photos are marked for identification. Numbers are recommended. Why? Because when you provide the list of matching coordinates, labeling them with a number might confuse people. Labeling them with a letter prevents this. And if you label with letters, you don't want to label the photos with letters too.
After cropping and marking the photos, and preparing the coordinates to match to the photos, you need to figure out how you want cachers to determine the coordinates. One way to do this is to make math equations. Write out a basic formula for the provided coordinates where certain positions equal certain letters. For example:
N 40° 35.189 W 098° 23.354
N 40° AB.CDE W 098°FG.HIJ
Then, for each picture, provide a formula, such as:
Photo A = (B+G)*(F-I)
As cachers match up the correct coordinates to each image, they use those coordinates to determine the value of each photo. Then they can plug those values into the final coordinates to determine where the cache is located at. Since this is done in the field, a coordinate checker isn't needed. Once they have the final coordinates, they can go after the cache to claim a find.
When submitting this design, it can be labeled as either a puzzle cache or a multi cache. If you aren't quite sure how to list it, contact your reviewer and ask for what they would like it listed as since they will be the ones approving it.
These two methods are the two most common methods I've seen, but there are probably other ways to set this up. I don't see Pict-O-Caches as often anymore, but I have seen a type called "Steeplechases" which are essentially method #2, but with a theme. Themed Pict-O-Caches can be fun too. While Pict-O-Caches aren't as common, I haven't met too many people who dislike them since they are a bit different and can be an interesting way to explore an area.
TripCyclone
PS: A thanks to reviewers *gln and Heartland Cacher for their input on how to submit a pict-o-cache and to Still Searching for letting me use some of the photos on his pict-o-cache. I probably SHOULD say thanks to Team Kryptos, but I didn't use any of their photos so they'll get a thanks for letting me reference their hide.
If there was ever a cache that everyone should try once, pict-o-caches would likely be near the top of the list. They take aspects of several different types of caches and join them together to make a cache that everyone can participate in and enjoy. But how do they work? First, we need to establish what they are.
Pict-o-caches are a class on their own. Taking cues from multi-caches, on-site puzzles, and visual puzzles, these puzzles definitely require an observant eye. Given a location to start at, you are basically guided through a multi-cache not by finding hidden stages with coordinates inside, but by finding things right out in the open. The clues are pictures. Follow the pictures and find the cache. It sounds simple enough.
Let's look a bit closer. There are two basic methods of doing a pict-o-cache. For the first one, we'll use a pict-o-cache that I completed in 2008 with my friend 8601Delphinium. Both of us enjoyed this cache and thought it was a good example of this method. It is the Hastings Pict-O-Cache located in Hastings, NE, set up by Still Searching. In this method, you are given a starting location, usually the cache coordinates themselves. Standing in that location, you have to scan around the area. Somewhere, within your field of view, you would find this:
Obviously, this image shows a brick wall, so you would want to scan for brick buildings. It could be on a building near to you or one in the distance, but it will be in your view. One thing to consider is whether the object is close to the ground or not. If you find a building in your view that has other objects masking it, like vehicles, bushes, or trees, you'll need to take that into consideration. Once you find the object in the picture, you need to go over to it. Stand next to it, and begin searching for picture number two: Examining the photo, you at least now that it is near a window. Second, you can also guess that it is at least a second story window based on the ledge. Third, even though it also appears to be on a brick building, don't assume that it is the same building. So make sure to scan every building in your view. Okay, over there. That's the window. Let's move over to it. Time to find number three: Now, you can be certain that this is the corner of a building, and along the roof. Again, start scanning around, this time paying attention to roof corners that have this style of decoration on it. Wait...over there. Nope, it doesn't have the streetlamp object visible along the edge of the photo. But, if you look at that other corner of the same building, it does have it. Time to go to stage four.This is the overall idea of this type of pict-o-cache. It's nothing more than following the pictures. These caches are great caches for group caching or family caching. Everyone can get involved with finding the images, including kids.
But I said that the above method is just one type of this style of puzzle cache. So what's the other method? For the other method, I'll use Krypto Kache, found in Omaha, NE. Set up by Team Kryptos, this one still has you looking for pictures, but this time you are given a list of coordinates for the pictures. This might seem counter-intuitive, but it's not. The coordinates are just a list of coordinates with letters assigned to them, and the pictures are numbered. Go to each of the coordinates and figure out which of the photos is found there. Match each coordinate to a picture and you'll get numbers for the letters. Then fill in the numbers in the provided final coordinates based on the letters and you'll get the final location for the puzzle. Go to that location and find the cache.
Either method provides an interesting caching experience. But, what if you want to make one? Before you do anything, you'll need a few things.
Materials Needed:
- Camera
- Photo editing software
- Notebook
- Cache Container
- Logbook
A notebook? That seems odd. However I would also recommend bringing a notebook to help keep track of note only the order of the photos, but to match the photos to coordinates and to write notes about the photos. Both of those last two will make sense in a bit. For a cache container, any size can be used. Just remember to make it appropriate for the location you use. Ammo can's are obviously not the way to go if this cache will be designed in an urban area. And regarding the photo software. Anything will work. GIMP is a good free software. It has a learning curve, but there are plenty of tutorials out there to help and it is quite powerful considering it is free.
For the first method, there's a bit more that goes into preparing this puzzle. Start by finding a place to hide the cache (and mark the coordinates). Many of the pict-o-caches I've seen are usually found in vibrant urban environments. Urban areas provide a lot of different options for photos that you just won't find elsewhere. Whether using architecture, window, window displays, vents, signs, lamps, etc., you should have a pluthra of objects to use for photos. "Historic Downtown" areas often make great spots. Out in a park, on the other hand, is not so great. You have trees, bushes, plants, trees, benches, lamps, trees...imagine looking at a photo of a tree then looking around you to find a hundred trees that all look like the photo. Case settled. However, that doesn't mean a park can never work for this type of cache, it's just harder to make it work.
Once you find a location, you have two options. You can find a random starting location and work your way along a path to the final location, taking pictures along the way. Or you can do the same thing, only working backwards through the route. Either way works, but it might be easier to visualize if you work your way forwards through the route. I'll describe the rest as if you are doing it forwards.
Find a random starting location and grab the coordinates. Then, scan around and find something to take a photo of. Remember, your path can be whatever you want, so don't feel like you have to always be getting closer to the final location. Also, your photo can be at a distance, or it can be closer to the object you want to photograph. Feel free to mix it up to increase the difficulty, just make sure that what you see in the photograph is at least big enough to see from the previous spot. Another way to increase the difficulty is use only a portion of the photo. For example, instead of using a photo of the entire statue, crop it so that you only see a small portion of it. This also helps to reduce the chances that someone spots stage nine and rushes straight to that spot in the puzzle before they've done stages one through eight. This is where the notebook can really come in handy, as you can write down notes about each image in case you want to mess with the images on the computer.
Once you have your photograph, move to whatever you took a photo of and stand next to it. Before you continue, make sure to grab coordinates. You will want to add waypoints for each picture when you list your cache online. This helps the reviewer in two ways. One way is to help them see what route you are having the cacher go. They may see something you hadn't thought of based on where those stages are that may require fixing. Second, each picture is techniqually a stage in a multi-cache. Multi-cache guidelines require posting the waypoints for each stage. Some reviewers may see it as a puzzle cache and not require the additional waypoints, but trust me that it will be appreciated. Some reviewers will actually require them for the above reasons.
After you have your coordinates, repeat the above process until you reach the final location. When you close in on the final location, think carefully about the last two photos. The last photo should be close enough to narrow down where the final location is within 10 - 20 feet (or about the typical accuracy of your GPSr). The second to last photo should get you close enough that the last photo makes sense. If the final location is hidden in the skirt of lamp post, and your final location is of the skirt, the second to last photo should not have eight lamp posts in the image. Figure out a way to narrow it down to no more than two, maybe three if they are closer together. You'll get complaints from cachers if you don't.
Now that you have all your photos, coordinates for each photo, and have placed the hide, you're ready to go home. At home, you'll need to take some time to get everything organized. Hopefully, you took notes of the coordinates for each photo and a description so that you can quickly match things up. Load up your images and start preparing them. I recommend numbering your final images so that you can get them arranged properly. Feel free to put a visible number in the photo to help the cachers as well. If they are printing off a sheet of images then the numbers will help them keep everything in order too. Once you do have them prepared, you'll need to do one more thing.
When you post this online, you'll have an easier time displaying the photos if you create an image file that has the photos arranged in order that can be displayed online. Check out both of the linked caches listed earlier to see examples of this. It will make setting up the cache page easier. Also, don't forget to create additional waypoints for each image. They can be hidden from public view if using the "follow the images" method, or they can be public if using the "match the images" method (you have to list the coordinates anyway for this one). Get everything ready to go and submit. As to the software to use for this, that may vary depending on your experience. This isn't needed, but it makes creating the cache page easier.
But what about that second method I described. You know, the one where you match the photos to the coordinates? This method has a bit wider range of options for where you can set it up as compared to the first method because you aren't following images to the hide, but matching images to get numbers in order to determine the final coordinates. Your images can be in a confined area of a few blocks or they can be spread out over a mile wide area. I've seen some spread out across entire communities. You just need to keep track of which images go with which coordinates. Find some locations with something you want to take a photo of and take several photos of varying zoom levels. You can also crop those as you see fit. Make sure you take coordinates of the spot you took the photo from. If using the notebook, take note of which coordinates go with which image. Keep doing this for the number of photos you want to use, then find somewhere to place the final cache.
Once you get home, make sure the photos are marked for identification. Numbers are recommended. Why? Because when you provide the list of matching coordinates, labeling them with a number might confuse people. Labeling them with a letter prevents this. And if you label with letters, you don't want to label the photos with letters too.
After cropping and marking the photos, and preparing the coordinates to match to the photos, you need to figure out how you want cachers to determine the coordinates. One way to do this is to make math equations. Write out a basic formula for the provided coordinates where certain positions equal certain letters. For example:
N 40° 35.189 W 098° 23.354
N 40° AB.CDE W 098°FG.HIJ
Then, for each picture, provide a formula, such as:
Photo A = (B+G)*(F-I)
As cachers match up the correct coordinates to each image, they use those coordinates to determine the value of each photo. Then they can plug those values into the final coordinates to determine where the cache is located at. Since this is done in the field, a coordinate checker isn't needed. Once they have the final coordinates, they can go after the cache to claim a find.
When submitting this design, it can be labeled as either a puzzle cache or a multi cache. If you aren't quite sure how to list it, contact your reviewer and ask for what they would like it listed as since they will be the ones approving it.
These two methods are the two most common methods I've seen, but there are probably other ways to set this up. I don't see Pict-O-Caches as often anymore, but I have seen a type called "Steeplechases" which are essentially method #2, but with a theme. Themed Pict-O-Caches can be fun too. While Pict-O-Caches aren't as common, I haven't met too many people who dislike them since they are a bit different and can be an interesting way to explore an area.
TripCyclone
PS: A thanks to reviewers *gln and Heartland Cacher for their input on how to submit a pict-o-cache and to Still Searching for letting me use some of the photos on his pict-o-cache. I probably SHOULD say thanks to Team Kryptos, but I didn't use any of their photos so they'll get a thanks for letting me reference their hide.
Sunday, February 28, 2010
Geocaching...from your computer?
I am trying to stick to a bi-weekly posting on this site. Last weekend found me away from home from Saturday through Tuesday, and I forgot. So here is a quick post featuring an online friend of mine, ErikaJean. Erika has put together a rather interesting blog that combines several of her various interests, including geocaching. It's obvious to anyone reading her blog that the keyboard loves her. But today, we focus on a YouTube video she put together that definitely fits into the Creative Caches site. It's called Interactive Geocaching, but there's just one problem. There's no actual cache to find.
If you are a fan of computer games, you've probably played a game inspired by Myst. Myst was an graphic adventure game released in 1993, most notable for it's "Choose Your Own Adventure" like method of story telling. You were in control of how you played the game, with the ability to explore at your own free will. You clicked on a spot in the game and it would either move you in that direction, or you interacted with something in the game world.
Erika has created a YouTube video that plays out just like Myst. The collection of videos give you the opportunity to try and find a geocache from the comfort of your computer. Now while none of our readers will be able to claim a find from the video, I have an idea for how to turn this into an actual cache.
Required Materials
Now, pick a collection of different items within your view: bushes, trees, man-made structures, etc. You want a good collection of a least 10 different items. Try to make the items viable hiding locations for your container (this works best if you are using a micro or small container). Shoot a short introduction video of the scene with you speaking in the background. If your camera has the option, make sure to stop each time you shoot a scene so you have easy reference points for later editing.
Once you've shot the intro, begin shooting video of you walking towards the various objects you noted earlier. If your hand comes into view as you move things about in a fake search for a cache container then don't worry about it. Play it up a bit. Add commentary as you film. After you film the various objects, pick a couple of random points that may seem like obviously unlike locations, but film them anyway. It will provide more options for viewers.
Once you're done filming, and you have both the starting coords for the video and the final location's coords, head on home and go through the process of editing. You'll need a collection of short videos encompassing all of the random points people might choose, including the correct location. Edit them however you want, but in the clip that leads to the actual cache, post the coordinates for Waypoint A into the end of the video. This way, when people find the correct location in the video, they will get the coordinates for the video's starting location. Once they arrive on scene, they should see a view just like the video. They already know where the final is located at, so the find will be easy from that point on.
Now all you need to do is upload the videos. YouTube provides an easy, free option for doing so. Once they are uploaded, you'll need to add linked notes to the video. YouTube calls them "annotations" and they can be added by going to "My Videos" after logging in, finding the starting video, and clicking on "Annotations". When you do this, make sure you have a second tab open so you can get the URL's for each video. Pick the point in the starting video where you want to give people the option to pick their choices. Pause the video there and add a notation. Spread the annotation out over one of the areas people can choose, switch it to the "Notes" type (you can use "Speech Bubble" or "Spotlight" if you want), then click on the chain link icon to create an Annotation Link. This is where you paste the URL for the video that explores that particular spot. You'll have to be organized at this point so that all of the annotations link to the proper videos. Once done, you'll have a video much like Erika's.
Yes, it's an easy find for anyone who completes the video. But it will also be a fun find. Due to the nature of the design, it should probably be listed as a puzzle cache. This means that even cachers who don't like puzzles would be hard pressed to complain about this. And if they automatically ignore puzzles without even looking at them, this is a shining example of why that practice can backfire. This is also a kid friendly cache design that any geocachers with kids in your area will enjoy.
Enjoy,
TripCyclone
PS: And a thanks to ErikaJean for letting me highlight her video. The starting video is below:
If you are a fan of computer games, you've probably played a game inspired by Myst. Myst was an graphic adventure game released in 1993, most notable for it's "Choose Your Own Adventure" like method of story telling. You were in control of how you played the game, with the ability to explore at your own free will. You clicked on a spot in the game and it would either move you in that direction, or you interacted with something in the game world.
Erika has created a YouTube video that plays out just like Myst. The collection of videos give you the opportunity to try and find a geocache from the comfort of your computer. Now while none of our readers will be able to claim a find from the video, I have an idea for how to turn this into an actual cache.
Required Materials
- A micro or small geocache, ready to go
- A video camera
- A computer
Now, pick a collection of different items within your view: bushes, trees, man-made structures, etc. You want a good collection of a least 10 different items. Try to make the items viable hiding locations for your container (this works best if you are using a micro or small container). Shoot a short introduction video of the scene with you speaking in the background. If your camera has the option, make sure to stop each time you shoot a scene so you have easy reference points for later editing.
Once you've shot the intro, begin shooting video of you walking towards the various objects you noted earlier. If your hand comes into view as you move things about in a fake search for a cache container then don't worry about it. Play it up a bit. Add commentary as you film. After you film the various objects, pick a couple of random points that may seem like obviously unlike locations, but film them anyway. It will provide more options for viewers.
Once you're done filming, and you have both the starting coords for the video and the final location's coords, head on home and go through the process of editing. You'll need a collection of short videos encompassing all of the random points people might choose, including the correct location. Edit them however you want, but in the clip that leads to the actual cache, post the coordinates for Waypoint A into the end of the video. This way, when people find the correct location in the video, they will get the coordinates for the video's starting location. Once they arrive on scene, they should see a view just like the video. They already know where the final is located at, so the find will be easy from that point on.
Now all you need to do is upload the videos. YouTube provides an easy, free option for doing so. Once they are uploaded, you'll need to add linked notes to the video. YouTube calls them "annotations" and they can be added by going to "My Videos" after logging in, finding the starting video, and clicking on "Annotations". When you do this, make sure you have a second tab open so you can get the URL's for each video. Pick the point in the starting video where you want to give people the option to pick their choices. Pause the video there and add a notation. Spread the annotation out over one of the areas people can choose, switch it to the "Notes" type (you can use "Speech Bubble" or "Spotlight" if you want), then click on the chain link icon to create an Annotation Link. This is where you paste the URL for the video that explores that particular spot. You'll have to be organized at this point so that all of the annotations link to the proper videos. Once done, you'll have a video much like Erika's.
Yes, it's an easy find for anyone who completes the video. But it will also be a fun find. Due to the nature of the design, it should probably be listed as a puzzle cache. This means that even cachers who don't like puzzles would be hard pressed to complain about this. And if they automatically ignore puzzles without even looking at them, this is a shining example of why that practice can backfire. This is also a kid friendly cache design that any geocachers with kids in your area will enjoy.
Enjoy,
TripCyclone
PS: And a thanks to ErikaJean for letting me highlight her video. The starting video is below:
Sunday, February 7, 2010
Decorating the Logbook
Not every creative cache has to be only about the container. Sometimes it's about the presentation of the cache. Telling a good story. Taking the cacher on a hike through the story. Making the cache fit the story. It's all about the presentation. Cache of the Lost Sunglasses is an example of such a cache. It told the story of a geocaching family, the father of which lost his sunglasses on the trail. The cache took you on a lengthy hike through a park, visiting different stages along the trail where the family encountered different situations during their hike. Over the course of the hike, if you read the story that went with it, you gained clues for finding the stages. The stages weren't spectacular, the hides weren't elaborate. It was the story, the mood, that set the level of fun for that cache. Unfortunately, it was archived in 2008.
Designing a good story is not something you can really tell someone how to do so we won't focus on that. One thing we will focus on is the logbook. Now the logbook might seem like an unlikely part of the overall cache to focus. Yet with the right cache, it can be a valuable part of telling the story. Decorating a logbook works best with caches where the log has a book form to it, be it a pocket notebook for a small cache or larger book in an ammo can. So today, we are going to look at one of my own caches, Necronomicron Ex-Mortis. In particular, how the logbook fits into the design.
If you've seen The Evil Dead movies, you might recognize the name of the cache. It was the evil Book of the Dead in the movies, the cause of all the horrors that occurred. Bound in the human flesh and written in the blood of souls tortured by a group of Dark Ones. An interesting example of B-horror films that has developed a cult status among horror movie fans.
For this cache, we need a few supplies:
The logbook is something else. A basic notebook might work fine but for selling the cache you might have to splurge a bit and get a nicer notebook that is hardbound. When you get a notebook, think about the fact that you are applying hot glue to the cover when you pick one out.
Once you have your supplies, it's time to let your imagination run wild. It's best to do one side of the cover at a time. The basic steps to follow:

Designing a good story is not something you can really tell someone how to do so we won't focus on that. One thing we will focus on is the logbook. Now the logbook might seem like an unlikely part of the overall cache to focus. Yet with the right cache, it can be a valuable part of telling the story. Decorating a logbook works best with caches where the log has a book form to it, be it a pocket notebook for a small cache or larger book in an ammo can. So today, we are going to look at one of my own caches, Necronomicron Ex-Mortis. In particular, how the logbook fits into the design.
If you've seen The Evil Dead movies, you might recognize the name of the cache. It was the evil Book of the Dead in the movies, the cause of all the horrors that occurred. Bound in the human flesh and written in the blood of souls tortured by a group of Dark Ones. An interesting example of B-horror films that has developed a cult status among horror movie fans.
For this cache, we need a few supplies:
- Liquid Latex
- Hot Glue Gun
- Hot Glue Sticks
- A logbook (preferably a hardbound notebook)
- Fake Blood
- Q-tips
- Paint (or stage makeup...preferably skin tones)
- Brushes/makeup sponges
- Spray Adhesive
The logbook is something else. A basic notebook might work fine but for selling the cache you might have to splurge a bit and get a nicer notebook that is hardbound. When you get a notebook, think about the fact that you are applying hot glue to the cover when you pick one out.
Once you have your supplies, it's time to let your imagination run wild. It's best to do one side of the cover at a time. The basic steps to follow:
- Plan out a pattern for the cover to be laid out with hot glue.
- Apply the hot glue...carefully...in the pattern you choose. Pay attention to how thick or thin you apply the glue to best achieve your goal.
- Let it dry, then carefully apply a thin layer of liquid latex using the Q-tips. You can pour a small amount in spots and spread it out if desired.
- Let the latex dry, then apply a thin later of make-up. Pick a skin-tone and carefully stipple it onto the cover. For those unfamiliar with that term, stippling involves patting the paint onto the surface as opposed to brushing it or smearing it on. For stage makeup, this helps create a more natural effect on the book. The makeup doesn't have to be fully even, opaque layer.
- Once the paint has dried, repeat steps 3 and 4 once more. At this stage, begin applying any additional colors you choose to use, or even some fake blood in spots if desired.
- Let it all dry, then repeat the procedure for the back cover and spine.
- Once finished, add a thin coat of spray adhesive. Remember to not hold it so close that it creates weird bubbles on the cover.

This was designed to resemble a vision of the book from one of the movies. You can see the eyes, the nose, an ear near the spine on the left, and the mouth if you look near the bottom center. Teeth were designed into the mouth, and I later applied white makeup, some darker lines to separate the teeth, and some fake blood coming from the mouth.
Now, for a few steps that I did not have time to get too. In the movies, the pages of the book are written in blood, containing weird languages, symbols, and drawings. I had hoped to use the fake blood to design some similar pages inside but never got around to it.
The point of this post is to show how even the logbook can be part of making a creative cache. Does it have to be a design out of a B-Horror flick? Not at all. This design was used for a night cache at my Halloween event last year, hence the horror theme. This particular design works best with a regular size cache, but even a small cache can have a creative logbook.
If you are looking for something different to do, think about a cache with a story. Then see how you can fit every aspect of the cache design into the story, including the logbook.
TripCyclone
Thursday, December 24, 2009
The Best Selling...Puzzle Cache?
It's Christmas Eve. Dinner's cooking, people are wrapping gifts. It's SNOWING down here in Dallas. I've been busy the last few weeks as first semester ended at work, but I haven't stopped looking for interesting cache ideas. Tonight, I bring you another easy puzzle like last time. What's different is that this is a hands-on, multi-stage, puzzle cache.
Here's the supply list:
The first thing you are going to need to do is figure out where you want the FINAL cache to be at. Do this however you want and get the coordinates for the location. Place the final and let's go find a spot for the first stage.
Once you find a spot to place the first stage, let's get out the coordinates for the final, the marker, and the solved Rubik's Cube. Pick two sides of the cube, any two sides. Break up the coordinates into the Latitude and Longitude (N/S & E/W). Now write one digit from the Latitude into each square of one of the sides, going from left to right, top to bottom. Imagine the 3x3 grid as Lines 1, 2, & 3. Here's an example of how to write it:
Line 1: N 1 2
Line 2: 3 4 .
Line 3: 5 6 7
There are just enough spots for the full coordinates. Put the Longitude on another side, and drop the W or E if your degrees are three digits. Most people will realize that is longitude anyway.
Now scramble up the Rubik's Cube THOROUGHLY. Take a few minutes to really get it random. Then, drop it into the cache container. You might want to add a small note explaining that the finder has to solve the cube to figure out the coordinates for the final (unless they are good at solving a Rubik's Cube, most people will solve the coordinates by solving it one side at a time). Now hide the container.
Easy to set up, relatively easy to solve. And it's a fun one for kids too, if you kids like these kinds of toys.
And everyone have Merry Christmas.
TripCyclone
Here's the supply list:
- Two cache containers
- Logsheet
- Permanent Marker
- Rubik's Cube
The first thing you are going to need to do is figure out where you want the FINAL cache to be at. Do this however you want and get the coordinates for the location. Place the final and let's go find a spot for the first stage.
Once you find a spot to place the first stage, let's get out the coordinates for the final, the marker, and the solved Rubik's Cube. Pick two sides of the cube, any two sides. Break up the coordinates into the Latitude and Longitude (N/S & E/W). Now write one digit from the Latitude into each square of one of the sides, going from left to right, top to bottom. Imagine the 3x3 grid as Lines 1, 2, & 3. Here's an example of how to write it:
Line 1: N 1 2
Line 2: 3 4 .
Line 3: 5 6 7
There are just enough spots for the full coordinates. Put the Longitude on another side, and drop the W or E if your degrees are three digits. Most people will realize that is longitude anyway.
Now scramble up the Rubik's Cube THOROUGHLY. Take a few minutes to really get it random. Then, drop it into the cache container. You might want to add a small note explaining that the finder has to solve the cube to figure out the coordinates for the final (unless they are good at solving a Rubik's Cube, most people will solve the coordinates by solving it one side at a time). Now hide the container.
Easy to set up, relatively easy to solve. And it's a fun one for kids too, if you kids like these kinds of toys.
And everyone have Merry Christmas.
TripCyclone
Wednesday, December 9, 2009
A Picture Perfect Puzzle
On today's edition of Creative Caches & Containers, we come back to the category of puzzle caches. This time, we will look at a puzzle cache that not only can be made to fit ANY cache container you so desire, but can be solved by anyone.
For this puzzle, you will need a few things:
To solve the puzzle, geocachers have to use the photos to figure out where you were standing. Then, upon determining where you were at when you took the photos, they commence the cache finding operation. Voila, you have a puzzle cache.
Relatively simple in design, and simple in execution, there are a few things we want to look at. First of all is location. When finding a location for just this kind of cache, you need to make sure that there are visual landmarks nearby that can be matched up in photos. Topography, artwork, buildings, signs, poles, and even landscaping (in doses) can make good visual landmarks. On the other hand, placing this kind of cache out in the woods is torture. It doesn't mean it can't be done. You might be able to find some unique looking trees that really stand out from the surrounding trees, providing an easy landmark. But in general, it isn't going to have geocachers walking away in a happy mood.
The next thing to consider is the photos. You want the photos to be useful in identifying where you stood. There are two ways to do the photos. You can take a group of individual photos in different directions from where you stood. A cacher would print off the photos and upon arriving on site, would use compare the relative positions of objects in the photos to triangulate the cache location. But, you could also get more elaborate and produce a panoramic. I know that not all of you are familiar with making a panoramic, so let's look at how that is done. This is where the Creative Cache article turns into a Photography How-To article.
Panoramics are rather simple to make. In the simplest sense, it only takes two overlapping photos to make a panoramic. Ideally, you want to use a tripod to ensure horizontally level photos. For the purposes of this puzzle cache, you can easily shoot it handheld. You can shoot the photos two wide, three wide, or more. You can shoot two tall, three tall, or more. No matter how many photos make up your final image, there's just one thing you need to make sure you do. The photos need to overlap each other by about 1/4th to 1/3rd of the photos. I've provided an example of my own for you below. In this example, you'll see two images side by side. The section of the photo that is Black and White shows the section of the final image that overlaps. These were taken handheld.

 Notice the tall tree in the overlapping section. When taking photos for a panoramic, it's important that SOMETHING is visible in that section of the photo. This provides points for software to match up when combining the images.
Combining photos would seem like a hard task. You have to individually go back and forth matching up specific points on both photos, then hoping the software can recognize those points and properly stitch together the images. But wait, there's more. After doing that, you will likely have to open the photo up in an image editor and fix any color differences to blend the images seamlessly. Yeah, not exactly something to look forward to. Thankfully, there is software out there that will drastically simplify the process. It's called AUTOSTITCH.
Once the software is on your computer, open it up. Before doing anything else, open the "Options" menu. In the upper left corner is an option for image size that will have 10% as the default value. Change that to 100%. You can play with other options if you want, but the only other thing I usually mess with is something in the lower left that says "Sigma gain". I usually push this to .3 instead of .1 before closing the options. Then, just load the images and the program will do the work for you. It isn't perfect, but most problems that I have ever run into are usually the result of a poor images and not the software. Here is an example of the above two images after running them through Autostitch:

Once the program is done stitching the photos, just open the photo up in a basic image editing program and crop out the black borders if desired. For posting on Groundspeak's site, you'll probably want to reduce the image size a bit. Most image editors have an option for that.
There you go. You have the images you need for producing this puzzle. But, I have one more trick up my sleeve. And for this one, I'm going to employ some help from Team Gamsci, a geocacher from De Sota, Iowa. Team Gamsci likes to take videos, which you can view on their YouTube Channel, which displays some of their Geocaching videos. In 2007, while thinking about videos, Team Gamsci came up with an idea very similar to the one I've described above, but with one difference. Instead of using a picture, they made a video while standing next to the cache. In fact, the tip about having identifiable landmarks came from Team Gamsci when I asked if he had any tips for someone interesting in using their idea. The cache they did this with is called Frames Per Second, and it is located West of Des Moines, Iowa right off of Interstate 80. I actually found this cache back in May of 2009 while on my way back to Kansas City from visiting the GPS Adventure Maze with WebScouter., one of my Geo-buddies.
This can be a fun puzzle for anyone of any age. The use of pictures or videos makes this a very visual puzzle that anyone can solve too. And everyone likes puzzles that anyone can solve.
TripCyclone
For this puzzle, you will need a few things:
- A cache container
- A logbook
- A computer
- A camera
To solve the puzzle, geocachers have to use the photos to figure out where you were standing. Then, upon determining where you were at when you took the photos, they commence the cache finding operation. Voila, you have a puzzle cache.
Relatively simple in design, and simple in execution, there are a few things we want to look at. First of all is location. When finding a location for just this kind of cache, you need to make sure that there are visual landmarks nearby that can be matched up in photos. Topography, artwork, buildings, signs, poles, and even landscaping (in doses) can make good visual landmarks. On the other hand, placing this kind of cache out in the woods is torture. It doesn't mean it can't be done. You might be able to find some unique looking trees that really stand out from the surrounding trees, providing an easy landmark. But in general, it isn't going to have geocachers walking away in a happy mood.
The next thing to consider is the photos. You want the photos to be useful in identifying where you stood. There are two ways to do the photos. You can take a group of individual photos in different directions from where you stood. A cacher would print off the photos and upon arriving on site, would use compare the relative positions of objects in the photos to triangulate the cache location. But, you could also get more elaborate and produce a panoramic. I know that not all of you are familiar with making a panoramic, so let's look at how that is done. This is where the Creative Cache article turns into a Photography How-To article.
Panoramics are rather simple to make. In the simplest sense, it only takes two overlapping photos to make a panoramic. Ideally, you want to use a tripod to ensure horizontally level photos. For the purposes of this puzzle cache, you can easily shoot it handheld. You can shoot the photos two wide, three wide, or more. You can shoot two tall, three tall, or more. No matter how many photos make up your final image, there's just one thing you need to make sure you do. The photos need to overlap each other by about 1/4th to 1/3rd of the photos. I've provided an example of my own for you below. In this example, you'll see two images side by side. The section of the photo that is Black and White shows the section of the final image that overlaps. These were taken handheld.

 Notice the tall tree in the overlapping section. When taking photos for a panoramic, it's important that SOMETHING is visible in that section of the photo. This provides points for software to match up when combining the images.
Combining photos would seem like a hard task. You have to individually go back and forth matching up specific points on both photos, then hoping the software can recognize those points and properly stitch together the images. But wait, there's more. After doing that, you will likely have to open the photo up in an image editor and fix any color differences to blend the images seamlessly. Yeah, not exactly something to look forward to. Thankfully, there is software out there that will drastically simplify the process. It's called AUTOSTITCH.
Once the software is on your computer, open it up. Before doing anything else, open the "Options" menu. In the upper left corner is an option for image size that will have 10% as the default value. Change that to 100%. You can play with other options if you want, but the only other thing I usually mess with is something in the lower left that says "Sigma gain". I usually push this to .3 instead of .1 before closing the options. Then, just load the images and the program will do the work for you. It isn't perfect, but most problems that I have ever run into are usually the result of a poor images and not the software. Here is an example of the above two images after running them through Autostitch:

Once the program is done stitching the photos, just open the photo up in a basic image editing program and crop out the black borders if desired. For posting on Groundspeak's site, you'll probably want to reduce the image size a bit. Most image editors have an option for that.
There you go. You have the images you need for producing this puzzle. But, I have one more trick up my sleeve. And for this one, I'm going to employ some help from Team Gamsci, a geocacher from De Sota, Iowa. Team Gamsci likes to take videos, which you can view on their YouTube Channel, which displays some of their Geocaching videos. In 2007, while thinking about videos, Team Gamsci came up with an idea very similar to the one I've described above, but with one difference. Instead of using a picture, they made a video while standing next to the cache. In fact, the tip about having identifiable landmarks came from Team Gamsci when I asked if he had any tips for someone interesting in using their idea. The cache they did this with is called Frames Per Second, and it is located West of Des Moines, Iowa right off of Interstate 80. I actually found this cache back in May of 2009 while on my way back to Kansas City from visiting the GPS Adventure Maze with WebScouter., one of my Geo-buddies.
This can be a fun puzzle for anyone of any age. The use of pictures or videos makes this a very visual puzzle that anyone can solve too. And everyone likes puzzles that anyone can solve.
TripCyclone
Sunday, November 15, 2009
An Attractive PVC Cache
Today, we are going to look at a cache that is similar to a design we've looked at before. The difference is we've made it a bit larger. You'll need some supplies for this one so let's look at the essentials.
When you are ready to get supplies, the first thing to decide on is the cache container. You will need a tubular shaped cache. For our design, we'll use a waterproof matchstick container. They are easy to find in any camping store or department. The reason we need to figure out the cache container first is that the width of the container will help us pick the PVC pipe you'll need.
The cache will need to fit easily inside the PVC pipe, so after you figure out what container you are using, either measure it's width or take it to the hardware store with you. You need a section of PVC pipe that is at least a half inch wider than the cache container. Also, make sure it's about four feet in length. You can bump that to five feet if you'd like.
Next, we need a magnet. Aim for a magnet that is between half as wide to the full width of the cache container. Try not to get one that is wider than the magnet, or else you'll need to widen the PVC pipe to account for that. Just make sure you have some superglue (or another adhesive) designed for outdoor use. You may want a second one, and we'll come to why later.
Last of all, the bolt. You need to get a bolt that is wider than the PVC pipe. Aim for one that is about two - three inches wider. Get washers and nuts to go with it, and make sure you have a drill bit wide enough to make a hole for the bolt. There is one more thing. If you can, get a bolt made from a non-magnetic metal. There are some out there, you just have to look. If you can't find one, then scrap the second magnet I mentioned in the above paragraph and talked about below as it will actually hinder the cache.
Now you should have all the supplies you need. Let's start building by attaching the magnet to one end of the cache. I would suggest attaching it to the end of the container opposite the lid. You don't want someone to accidently remove the magnet. Be thorough with gluing it on.
While that is drying, let's get the PVC pipe. You'll need to place about a foot of this into the ground so measure a foot from one end of the pipe and mark that spot with a line around the pipe. Next, measure about one inch further up the pipe and mark that spot with two dots on opposite sides from each other. Measure another inch and repeat. Do this two more times. You will drill holes through each of these dots. Two of the holes need to be drilled wide enough to fit that bolt we talked about. The bolt should not be placed in the bottom set of holes. Ideally, try to place it in the last set, farthest from the line. The remaining holes are the drainage holes, hence why you want the bolt in the highest set of holes. When you put this pipe into the ground, those holes will help make sure the pipe can drain any water that collects inside. The bolt will help hold the cache up out of the water when the pipe fills.
By now, the glue is likely dry (unless you used Gorilla Glue). Grab the newly drilled pipe, your post-hole diggers, the cache container, and a logsheet. I'd recommend a small baggie for the logsheet (can be found in any crafts store or department near where they have bead supplies). Time to go to the cache site.
At the selected cache site, you'll need to dig that hole. This is why you need permission. Once you have the hole dug, pack some of the dirt into the end of the PVC pipe that you measured. Try your best to keep this packed dirt under that line, as you want to keep those drainage holes clear of dirt. If you can, use something to stick in the top of the pipe to help pack down the dirt at the bottom, be it a stick or a hiking pole. Once this is ready, stick the pipe into the hole and fill the surrounding hole up with dirt. If done right, the line you drew should be level with the ground. Make sure you pack down the dirt to help secure the pipe. If you are able to find a spot close to a fence or other structure, you can even help tie the pipe to that structure to help hold it up.
Now for the tricky part. Make sure you place the geocache into the top of the pipe so that the magnet is facing up. For security purposes, you can always attach a magnet at both ends of the container just in case a geocacher puts it in upside down. But don't do this unless you can get a bolt that won't attract magnets. If you do, and you place a container with magnets on both ends into the pipe, the bolt will grab hold of the magnet and nobody will be able to retrieve the cache. If you are forced to use a bolt that will attract the magnet, make sure to include a line in the cache description about being careful replacing the cache (you don't have to say way, just that they need to be careful).
The cache works like my Magnetic Micro cache, but on a larger scale. A geocacher will have to bring something that they can lower down into the pipe to "Attract" the magnet on the geocache, then pull it up to retrieve. Now it should make sense why we placed drainage holes and why we put the bolt in there, alongside why I made a big deal about the magnetism of the bolt and using two magnets.
Oh, and you can easily modify this one a bit. Here is a design that MrDSW took of just this kind of cache (used with permission):

- A piece of PVC pipe, about four feet long
- Post-hole Digger
- Power drill and some drill bits (read below to figure out what sizes)
- A bolt, two washers and two nuts (see below for details)
- A tube shaped cache, small or micro sized
- A magnet
- Superglue (preferably a kind that's designed for outdoor use)
- Logsheet
When you are ready to get supplies, the first thing to decide on is the cache container. You will need a tubular shaped cache. For our design, we'll use a waterproof matchstick container. They are easy to find in any camping store or department. The reason we need to figure out the cache container first is that the width of the container will help us pick the PVC pipe you'll need.
The cache will need to fit easily inside the PVC pipe, so after you figure out what container you are using, either measure it's width or take it to the hardware store with you. You need a section of PVC pipe that is at least a half inch wider than the cache container. Also, make sure it's about four feet in length. You can bump that to five feet if you'd like.
Next, we need a magnet. Aim for a magnet that is between half as wide to the full width of the cache container. Try not to get one that is wider than the magnet, or else you'll need to widen the PVC pipe to account for that. Just make sure you have some superglue (or another adhesive) designed for outdoor use. You may want a second one, and we'll come to why later.
Last of all, the bolt. You need to get a bolt that is wider than the PVC pipe. Aim for one that is about two - three inches wider. Get washers and nuts to go with it, and make sure you have a drill bit wide enough to make a hole for the bolt. There is one more thing. If you can, get a bolt made from a non-magnetic metal. There are some out there, you just have to look. If you can't find one, then scrap the second magnet I mentioned in the above paragraph and talked about below as it will actually hinder the cache.
Now you should have all the supplies you need. Let's start building by attaching the magnet to one end of the cache. I would suggest attaching it to the end of the container opposite the lid. You don't want someone to accidently remove the magnet. Be thorough with gluing it on.
While that is drying, let's get the PVC pipe. You'll need to place about a foot of this into the ground so measure a foot from one end of the pipe and mark that spot with a line around the pipe. Next, measure about one inch further up the pipe and mark that spot with two dots on opposite sides from each other. Measure another inch and repeat. Do this two more times. You will drill holes through each of these dots. Two of the holes need to be drilled wide enough to fit that bolt we talked about. The bolt should not be placed in the bottom set of holes. Ideally, try to place it in the last set, farthest from the line. The remaining holes are the drainage holes, hence why you want the bolt in the highest set of holes. When you put this pipe into the ground, those holes will help make sure the pipe can drain any water that collects inside. The bolt will help hold the cache up out of the water when the pipe fills.
By now, the glue is likely dry (unless you used Gorilla Glue). Grab the newly drilled pipe, your post-hole diggers, the cache container, and a logsheet. I'd recommend a small baggie for the logsheet (can be found in any crafts store or department near where they have bead supplies). Time to go to the cache site.
At the selected cache site, you'll need to dig that hole. This is why you need permission. Once you have the hole dug, pack some of the dirt into the end of the PVC pipe that you measured. Try your best to keep this packed dirt under that line, as you want to keep those drainage holes clear of dirt. If you can, use something to stick in the top of the pipe to help pack down the dirt at the bottom, be it a stick or a hiking pole. Once this is ready, stick the pipe into the hole and fill the surrounding hole up with dirt. If done right, the line you drew should be level with the ground. Make sure you pack down the dirt to help secure the pipe. If you are able to find a spot close to a fence or other structure, you can even help tie the pipe to that structure to help hold it up.
Now for the tricky part. Make sure you place the geocache into the top of the pipe so that the magnet is facing up. For security purposes, you can always attach a magnet at both ends of the container just in case a geocacher puts it in upside down. But don't do this unless you can get a bolt that won't attract magnets. If you do, and you place a container with magnets on both ends into the pipe, the bolt will grab hold of the magnet and nobody will be able to retrieve the cache. If you are forced to use a bolt that will attract the magnet, make sure to include a line in the cache description about being careful replacing the cache (you don't have to say way, just that they need to be careful).
The cache works like my Magnetic Micro cache, but on a larger scale. A geocacher will have to bring something that they can lower down into the pipe to "Attract" the magnet on the geocache, then pull it up to retrieve. Now it should make sense why we placed drainage holes and why we put the bolt in there, alongside why I made a big deal about the magnetism of the bolt and using two magnets.
Oh, and you can easily modify this one a bit. Here is a design that MrDSW took of just this kind of cache (used with permission):
Note that the pipe used is attached to a girder for stability. Also, the unique idea of placing this lure makes it feel more like fishing, which is essentially what geocachers will be doing. If you look carefully at the cache container, you can get an idea of how they built it using PVC parts, a hook to attach to the hole at the back of the lure, and the tongue of the lure to attach the magnets too.
There are some other variations of this design, which I'll introduce in the next post.
By the way, I mentioned designing log books in my last post. Sorry I haven't posted since as I've been busy, but that is on my list. I'll give you a quick preview here: LOGBOOK SNEAK PEAK
TripCyclone
Saturday, September 19, 2009
Log Caches
How about a design that works with ANY size and shape of cache container? Well, almost any size. It might not work so well with large ammo cans or larger. It's a simple design, can go in a variety of places, and it will still make people think a bit at times. Oh yeah, I should also point out that this design employs the latest in 3D technology to camo the container. Intrigued?
The latest in 3D Technology? What exactly do you need for THAT?
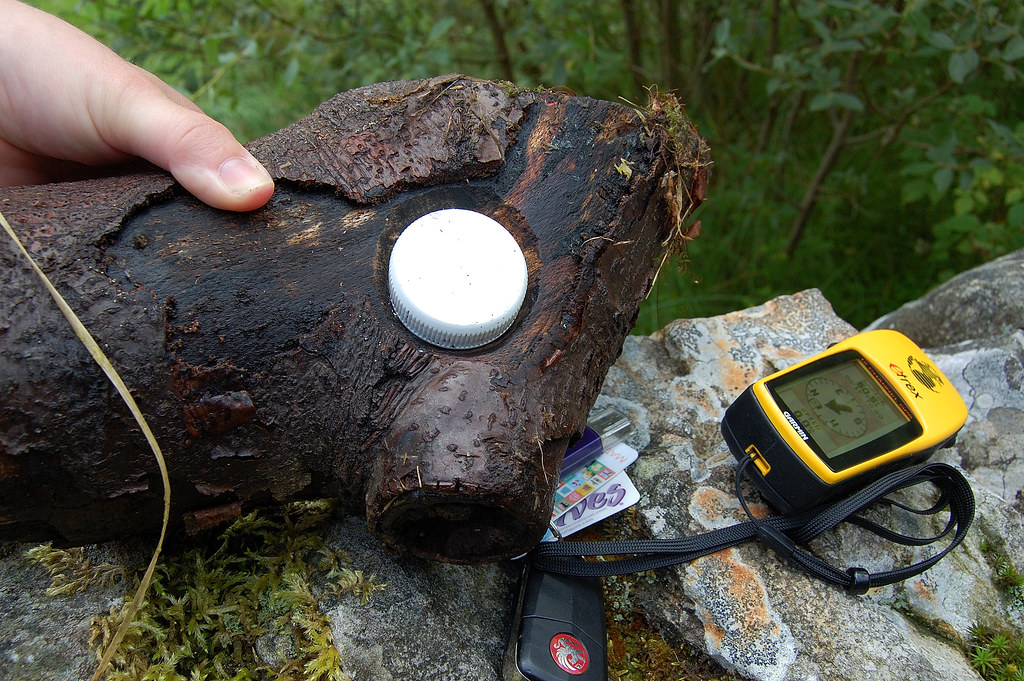
The basic design is to cut the log to fit the cache. Hide the cache in the hole, place on the ground upside down, and you have a hidden cache. Let's look a little more closely at the process.
First, you need to figure out what kind of cache you are going to use. At a minimum, a micro can be used. I'd recommend at least a pill bottle, though a 35mm film canister might work. You can get up to ammo can size, though you will have to make sure the log you use is big enough. A stump might work well for an ammo can.
Second, you need to figure out where to make the cut. If it's a stump, the bottom is the obvious spot. If you're using a log, depending on the size you might want to see how it will rest on the ground first. You don't want to cut the hole, place the cache into the hole, then find out that it naturally rolls to the side and exposes the hidden cache.
Once you've figured out where to make the cut, you'll need to start the cutting process. Now, if you're hiding a cache like a pill bottle, a power sander might be an option, albeit a slower one. A jig saw might be a good all around saw to use whether the hole is round or rectangular. Just make sure you are securing the log somehow before you do any cutting. You don't want that thing to slip out from under the saw, and possibly risk the saw slipping and hitting you. Remember, no cache is worth slicing off parts of your body. Also, consider how much room you want the cache to have while resting in the hole. If you make the hole too large, the cache won't stay in place. If it is too small, people will have a hard time getting it out and putting it back in, until it's been done enough to wear down the sides of the hole. In the end, a measurement might be needed. Using a sharpie, mark the outline of the cache on the log, and cut along the outside edge of that line. That should be good.
Now that the hole is cut, put the cache together with logsheet and possible swag (if big enough) and place it in the hole. Now, go find a spot to hide the cache and enjoy.
But what about those optional items? Well, over time, the cache container might slowly wear down the hole, making it easier to fall out. Or, you might have given it just a bit of extra room. We can fix this too. You will need something to use as a strap. You can find straps in the Sporting Goods stores or departments with camping gear. Rope may also work, but something flat like a strap is best. If you can search a bit, find a strap that will be wide enough to lay across the hole with the plastic fastener in the center of the rig.
Now, fasten the two pieces of the strap together and lay the strap ACROSS the cache, with either end extending out onto the wood and the plastic fastener in the center. On one side of the cache, about a half-inch to one inch from the cache, screw in a simple screw. Don't use a short screw, as you don't want it working it's way out too quickly while people retrieve the cache. Now do the same on the other side, screwing the strap securely into place.
In the end, the strap should lay out such that it holds the cache in place when latched shut. Then, when unlatched, each side stays screwed securely into the log. This whole extra step serves the extra purpose of holding the cache in place in case it loosens enough that it would fall out without the strap. Plus, as opposed to a similar design where you lift the log and the cache stays on the ground, when you lift the log up, geocachers will first look at the ground and see no cache. Unless they look at the log, they are likely to miss it, especially if the design is smaller. Tricky huh.
Here's one more picture of a similar design but with a larger container that I took a picture of:
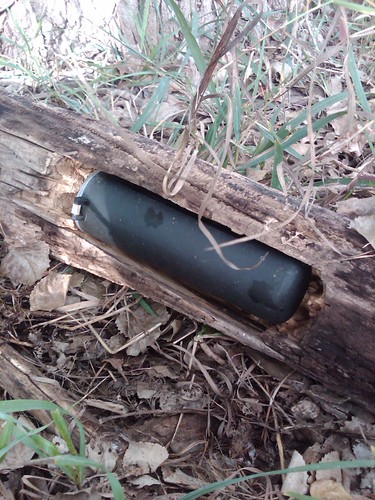
As mentioned, this design can work with a variety of sizes and shapes for the actual cache container. The container in the above picture is a paintball container. With the added "log" for hiding the cache, this also means you have a WIDE variety of locations you can hide this in the woods. This really helps allow you to pick just the right spot for the log. Then just work on how the surrounding brush can help blend the log in so that it doesn't stand out.
And that's how to build a "Log Cache". Enjoy.
TripCyclone
The latest in 3D Technology? What exactly do you need for THAT?
- A cache
- Logsheet
- Swag (depending on size)
- An actual wood log
- Power saw (type will depend on style)
- Something to use as a strap (hey...a strap might work :P )
- Screws
- Power drill
First, you need to figure out what kind of cache you are going to use. At a minimum, a micro can be used. I'd recommend at least a pill bottle, though a 35mm film canister might work. You can get up to ammo can size, though you will have to make sure the log you use is big enough. A stump might work well for an ammo can.
Second, you need to figure out where to make the cut. If it's a stump, the bottom is the obvious spot. If you're using a log, depending on the size you might want to see how it will rest on the ground first. You don't want to cut the hole, place the cache into the hole, then find out that it naturally rolls to the side and exposes the hidden cache.
Once you've figured out where to make the cut, you'll need to start the cutting process. Now, if you're hiding a cache like a pill bottle, a power sander might be an option, albeit a slower one. A jig saw might be a good all around saw to use whether the hole is round or rectangular. Just make sure you are securing the log somehow before you do any cutting. You don't want that thing to slip out from under the saw, and possibly risk the saw slipping and hitting you. Remember, no cache is worth slicing off parts of your body. Also, consider how much room you want the cache to have while resting in the hole. If you make the hole too large, the cache won't stay in place. If it is too small, people will have a hard time getting it out and putting it back in, until it's been done enough to wear down the sides of the hole. In the end, a measurement might be needed. Using a sharpie, mark the outline of the cache on the log, and cut along the outside edge of that line. That should be good.
Now that the hole is cut, put the cache together with logsheet and possible swag (if big enough) and place it in the hole. Now, go find a spot to hide the cache and enjoy.
But what about those optional items? Well, over time, the cache container might slowly wear down the hole, making it easier to fall out. Or, you might have given it just a bit of extra room. We can fix this too. You will need something to use as a strap. You can find straps in the Sporting Goods stores or departments with camping gear. Rope may also work, but something flat like a strap is best. If you can search a bit, find a strap that will be wide enough to lay across the hole with the plastic fastener in the center of the rig.
Now, fasten the two pieces of the strap together and lay the strap ACROSS the cache, with either end extending out onto the wood and the plastic fastener in the center. On one side of the cache, about a half-inch to one inch from the cache, screw in a simple screw. Don't use a short screw, as you don't want it working it's way out too quickly while people retrieve the cache. Now do the same on the other side, screwing the strap securely into place.
In the end, the strap should lay out such that it holds the cache in place when latched shut. Then, when unlatched, each side stays screwed securely into the log. This whole extra step serves the extra purpose of holding the cache in place in case it loosens enough that it would fall out without the strap. Plus, as opposed to a similar design where you lift the log and the cache stays on the ground, when you lift the log up, geocachers will first look at the ground and see no cache. Unless they look at the log, they are likely to miss it, especially if the design is smaller. Tricky huh.
Here's one more picture of a similar design but with a larger container that I took a picture of:
As mentioned, this design can work with a variety of sizes and shapes for the actual cache container. The container in the above picture is a paintball container. With the added "log" for hiding the cache, this also means you have a WIDE variety of locations you can hide this in the woods. This really helps allow you to pick just the right spot for the log. Then just work on how the surrounding brush can help blend the log in so that it doesn't stand out.
And that's how to build a "Log Cache". Enjoy.
TripCyclone
Monday, September 14, 2009
Placing a Night Cache
Okay, I'm going to be stealing a bit from an article I wrote on my personal blog at the beginning of 2009. This is only because I've laid out how to build a night cache already. However, I will add a few things here before I send you over to look at that article.
So why am I doing this? This past weekend, while at the 6th Annual Kearney Picnic in Kearney, NE, a group of us went after a night cache. Since it has been a week since my last post, I felt that this is a good time to update a bit of information about night caches. Especially since I am working on building some night caches for one of my own upcoming events. Let's take a look at what supplies you need to build a night cache:
You can also look online. Wildtech Corporation deals in fire tacks of various designs. It is one of there products that I finally got to see in action this last weekend. They sell tacks in 3D (pyramid shaped), 4D (cube shaped), and they even sell "Fire tape". Their products also come in different colors, including a Stealth color designed specifically for geocachers. I've seen the stealth color before and boy does it blend in during the daytime. This weekend, I saw the 4D design. Wildtech's tacks are smaller than the round tacks you'll find in stores, but they are bright and quite visible even at a distance.
As I talked with some fellow cachers, I will update one thing about the post I'm going to send you to. Placing the tacks at night is an effective way to verify that standing at each tack allows you to see the next one. On the other hand, you can also effectively place the tacks during the day. While it is harder to see the tacks at a distance, you can definitely see what you placed it on. The only thing to remember is that if you do place the tacks during the day, MAKE SURE you go back out at night at least once before you submit the cache to Geocaching.com so that you can make sure that others will be able to follow the path.
One last warning. This article was written both to explain what a night cache is, but also how to both find one and build one. The article is lengthier as a result of all of that information included. With the number of times I've heard geocachers say they enjoy night caches, it's hopefully enough information for you to build your own. I have three in the works myself.
Go to "What Are Night Caches?" to read the article.
Next, we'll talk about building Log Caches.
TripCyclone
So why am I doing this? This past weekend, while at the 6th Annual Kearney Picnic in Kearney, NE, a group of us went after a night cache. Since it has been a week since my last post, I felt that this is a good time to update a bit of information about night caches. Especially since I am working on building some night caches for one of my own upcoming events. Let's take a look at what supplies you need to build a night cache:
- Cache container (try to use at least a small since you'll be in the woods)
- Logbook
- Flashlight
- Reflective tacks
You can also look online. Wildtech Corporation deals in fire tacks of various designs. It is one of there products that I finally got to see in action this last weekend. They sell tacks in 3D (pyramid shaped), 4D (cube shaped), and they even sell "Fire tape". Their products also come in different colors, including a Stealth color designed specifically for geocachers. I've seen the stealth color before and boy does it blend in during the daytime. This weekend, I saw the 4D design. Wildtech's tacks are smaller than the round tacks you'll find in stores, but they are bright and quite visible even at a distance.
As I talked with some fellow cachers, I will update one thing about the post I'm going to send you to. Placing the tacks at night is an effective way to verify that standing at each tack allows you to see the next one. On the other hand, you can also effectively place the tacks during the day. While it is harder to see the tacks at a distance, you can definitely see what you placed it on. The only thing to remember is that if you do place the tacks during the day, MAKE SURE you go back out at night at least once before you submit the cache to Geocaching.com so that you can make sure that others will be able to follow the path.
One last warning. This article was written both to explain what a night cache is, but also how to both find one and build one. The article is lengthier as a result of all of that information included. With the number of times I've heard geocachers say they enjoy night caches, it's hopefully enough information for you to build your own. I have three in the works myself.
Go to "What Are Night Caches?" to read the article.
Next, we'll talk about building Log Caches.
TripCyclone
Wednesday, September 2, 2009
A Puzzle Cache for Kids
Creative Caches & Containers isn't just about the containers. It's about how the caches are done too. This next design is more about how the cache is done instead of how the container is built. And the best part...it's a great design for kids.
Puzzle caches can often be the bane of many geocachers. Some are easy, many are hard. The difficulty is usually dependant on the geocacher. If you like puzzles and do them regularly enough, you'll learn some tricks and can often see things others may not. Despite how puzzle caches are defined in one category, there are different types of puzzle caches of varying degrees. The automatic lumping of all puzzle caches into an ignore list often results in overlooking puzzles that can be both easy and fun to do. If you really want to hear my thoughts on this one, check out my post about puzzle caches called Ahhh...the Dreaded Mystery Cache, where you can find my own list of the different types of puzzles out there. Today's idea is a great example of what can be overlooked by ignoring puzzles.
Before explaining the idea, let's look at the materials list:
Now for the design. Before you can truly make this puzzle, you need to have found where you want to place the final cache and have collected the coordinates for that location. If designing with kids in mind, try to pick a place that parents will feel comfortable taking kids. The side of a cliff overhanging a creek or stream is probably not a good spot.
Once you have the coordinates, now you can begin making the cache. First, open up and put the puzzle together. If using an ammo can for the first stage, put it together on the side of the ammo can. This will help you visualize how geocachers will do the cache out in the field. Once you have it put together, carefully pick it up and flip it over. I used a small cutting board to slide it off the surface I was working on and flip it over all in one piece. Here is an example of where you should be at this point:

Now for the part where you turn this into a puzzle. In large letters, use the sharpie to write a message on the back of the puzzle. You can include what the geocacher is looking for, but make sure to include the final coordinates. Make sure to spread out your writing. You want as many pieces as possible to including writing. You can do this by using a single letter for each puzzle piece, or by writing across multiple pieces so that the letters are only visible when they are joined together. The more pieces with some form of writing on them the better. I've prepared a picture of what this might look like (disclaimer: the coordinates listed are false coordinates and do not belong to an actual geocache):

Puzzle caches can often be the bane of many geocachers. Some are easy, many are hard. The difficulty is usually dependant on the geocacher. If you like puzzles and do them regularly enough, you'll learn some tricks and can often see things others may not. Despite how puzzle caches are defined in one category, there are different types of puzzle caches of varying degrees. The automatic lumping of all puzzle caches into an ignore list often results in overlooking puzzles that can be both easy and fun to do. If you really want to hear my thoughts on this one, check out my post about puzzle caches called Ahhh...the Dreaded Mystery Cache, where you can find my own list of the different types of puzzles out there. Today's idea is a great example of what can be overlooked by ignoring puzzles.
Before explaining the idea, let's look at the materials list:
- 1- small or regular sized cache container
- 1- cache container of any desired size (since this is a kid friendly cache, aim for this one to hold some swag)
- 1- ziploc baggie, or a small tupperware container (must fit into the first cache container listed above)
- 1- 50 piece puzzle, small (preferably one small enough that the finished puzzle is smaller than the side of an ammo can).
- 1- log sheet or log book
- Random swag (if desired)
- 1 sharpie
Now for the design. Before you can truly make this puzzle, you need to have found where you want to place the final cache and have collected the coordinates for that location. If designing with kids in mind, try to pick a place that parents will feel comfortable taking kids. The side of a cliff overhanging a creek or stream is probably not a good spot.
Once you have the coordinates, now you can begin making the cache. First, open up and put the puzzle together. If using an ammo can for the first stage, put it together on the side of the ammo can. This will help you visualize how geocachers will do the cache out in the field. Once you have it put together, carefully pick it up and flip it over. I used a small cutting board to slide it off the surface I was working on and flip it over all in one piece. Here is an example of where you should be at this point:

Now for the part where you turn this into a puzzle. In large letters, use the sharpie to write a message on the back of the puzzle. You can include what the geocacher is looking for, but make sure to include the final coordinates. Make sure to spread out your writing. You want as many pieces as possible to including writing. You can do this by using a single letter for each puzzle piece, or by writing across multiple pieces so that the letters are only visible when they are joined together. The more pieces with some form of writing on them the better. I've prepared a picture of what this might look like (disclaimer: the coordinates listed are false coordinates and do not belong to an actual geocache):

Once the writing dries (which shouldn't be more than a minute or two if using a sharpie), then go ahead and take apart the puzzle. Now, using a ziploc baggie or a small tupperware container (if your first stage is an ammo can), package up the collection of puzzle pieces. At this point, I would recommend typing up a small sheet to put into the container with the puzzle, containing instructions for the cache. For example:
Puzzle Instructions:
Welcome to _________ cache. To solve this puzzle, you will need to put together the following puzzle. The puzzle is small enough that you can use the ammo can as your surface. On the back of the puzzle are the coordinates to the final cache. Please make sure to be careful with the pieces and that all pieces get back into the puzzle so that the next geocacher can have the same experience. There are fifty pieces. If any pieces are missing, please notify the cache owner. Enjoy.
As you can see, this not only helps let the cacher know how to get the final coordinates, but it is also a reminder to carefully put all puzzle pieces back. I'd recommend putting this in an easily visible spot, such as with the puzzle pieces.
At this point, your puzzle is ready to go. Just put the puzzle pieces' container inside whatever you are using for stage one. Get your final stage ready to go with the log book and whatever swag you want to use. Go out and place your final and find a nice spot somewhere else in the area for stage two. If designed for kids, try to not make cachers walk large distances, a half mile round trip is probably the maximum you want to make this...a quarter mile round trip is great for kids. Try to avoid making the kids go through heavy bushwhacking. If there's a trail nearby, even better. This might not work great for an urban environment, but parks, especially if it's a larger park that has trails and a playground is great for parents taking their kids geocaching. Get the coordinates for stage one and you are ready to go home and submit your cache.
Whether you want to explain how the cache works on the cache page or not is your own choice. You might want to try and at least mention that this is a kid friendly cache. If you want to put a reminder about being careful that all elements of stage one get back into the container, go ahead. Don't forget, this is a puzzle cache. Make sure you submit an additional waypoint for the final location for the reviewer, just make sure you select the option to keep it hidden from the public. Many puzzle caches will often state that the starting coordinates are bogus. You don't have to, but putting a note at the beginning of the description that informs cachers that the starting coordinates are NOT bogus might help those cachers who are a little bit more hesitant to go after puzzle caches. You can even add that it is an on site, kid friendly puzzle cache. Even experienced puzzle cache ignorers are likely to say "Hmmm...let's check this out".
There you go. You've just made a puzzle cache for kids. While many caches can be found by kids, going that extra step to make a cache specifically designed for kids will earn you a notch among those cachers that take their kids out with them. I should also point out that this design could also fit into the category of a multi-cache. I'd probably consider it a puzzle because you have to put together a puzzle to get the coordinates, instead of just having a piece of paper inside the first stage with the coordintes written on it.
I am currently working on using this design myself, but if any of you decide to put one of these out, let me know how it goes. Do you have another idea for a kid friendly cache? Scroll down to the bottom of this blog to see how you can send me your idea.
TripCyclone
Subscribe to:
Posts (Atom)


