Showing posts with label bison. Show all posts

Thursday, June 3, 2010

Pet Caches

Blending caches in with the environment can be tricky and there are a lot of ways to do so.  While camouflage can be very basic, to truly get it just right takes practice.  But there is another fun way to do camouflage that we will look at today, along with several examples of this method.  Because of the various methods used, it will be hard to provide a materials list that covers every possible method.  So we will try to highlight what will be needed for each of the provided examples so you can get an idea about how to approach the method.  And what is the method...

ANIMALS!

Yep, I said animals.  So what exactly does that mean?  Those of you who have found a lot of caches may have seen a cache built like this before.  It a geocache built to look like an animal.  In some cases, the animal part is a prop that has been turned into a geocache.  Other times, it is a geocache that is attached to some kind of animal prop.  And in some cases, the animal actually hides the container.  We will look at one of each of these methods.

MATERIALS
One hard part about the methods we will be looking at is finding the right prop for the design.  There are two easy places to find these items, though they aren't the only locations.  One is a Garden Center.  Many stores that cater to landscaping and gardening will often have some animal related props.  Another location would be Halloween stores.  While these are usually only found in early Fall, with a little bit of looking you can sometimes find stores that sell Halloween related goods year-round. 

ANIMAL IS THE GEOCACHE

Our first example is an animal that has been turned into a geocache.  In this example, the animal is typically a larger prop that is hollow in some form.  Is this always the case...definitely not.  I've seen examples of bison tubes made to look like insects.  But for this post, we will focus on a larger version.  For this example, you will need a few items:
  • A fake cat
  • Logsheet
  • Weather resistant glue
  • PVC Plug and respectively sized threaded PVC adaptor
For the PVC Plug and adaptor, you can commonly find something called a PVC Cleanout W/Plug.  This would fit perfectly.  You just need to find a size appropriate for your design.  First, we see the cache itself, held by one of my caching friends:

You can see the cat, along with the black PVC fitting attached to it's belly.  A hole was cut into the belly, cut to the diameter of the bottom of the PVC Cleanout. The cleanout is then glued to the cat.  The PVC Plug then can screw into the cleanout to create a water-tight seal (provided you've properly glued the cat to the PVC).  In this photo, you might also notice a small metal loop in front of the PVC plug.  This loop was used to attach the cat to a tree, as seen here:

To attach this the way it is shown, the person who hid this would have had to drill a small hole into the tree, then take a hook screw a bit larger than the hole and screw that into the tree as well.  This would then provide the hook for the loop you see in the above photo, thereby attaching the cat to the tree as shown.

While this design is pretty cool when you see it in person, this did require putting a screw into a tree, which could cause damage to the tree.  If you like how this is setup (and it was pretty cool when I saw it), I would encourage you to find a location that doesn't require drilling into a tree.  I have seen reviewers archive caches that do this and they are right to do so.  It may not seem like much, but this can cause damage.

As you can see in this image, the design does create an interesting atmosphere for a cache, especially on Halloween. I know I laughed pretty hard upon finding this because my first thought was that we had actually found a cat.  Imagine the logs you would receive with a cache like this.

ANIMALS ATTACHED TO THE GEOCACHE

The next type of animal cache involves attaching animals to a geocache.  One of the first examples of this that I ran into involved a fake rat attached to a 35mm film canister, hidden under a log.  I happened to go after it at night, which made the cache even more fun to find.  These types of hides are rather simple and require nothing more than a geocache and some kind of fake animal to attach to the outside.  Spiders, snakes, and rats are the most common fake animals you'll see used, but insects often work wonderfully as well.

When building a cache like this using a smaller cache size, you typically need nothing more than the geocache itself, the animal to attach, and a method for attaching it.  Weather resistant glue is the most commonly used method.  For larger caches, like ammo cans, some geocachers will use items like snakes and large spiders and just rest them on top of the cache.

Here is an example of a micro attached to an insect.  The photo was taken by rhondapalooza.


ANIMALS HIDING GEOCACHES

The last example involves using an animal to hide the geocache.  Now the above example of the cat might seem like it fits here to but there is a difference.  With the cat, the cat was turned into the geocache.  The PVC parts merely provided an easy method to open and close the container, but the cat's body was the geocache itself.  For this last method, the fake animal isn't the geocache itself, it's merely the camouflage designed to hide the geocache.  Here, let's see an example of this:
In this example, the bird is the camo.  If you look closely, you can see the red, rounded edge of the geocache sticking out the back end of the bird.  It is hard to tell from this view, but the bird is actually carved from a lightweight wood, carefully painted to look like a real bird.  Using a drill, a hole was created for the bison tube.  A perch was created and tied to the tree on which the bird is attached.  Look carefully and you can see a triangular piece on the back end of the perch which helps prevent the bison tube from falling out accidentally.  To retrieve this cache, the bird rotated forward just a bit.  This was achieved by making the feet loop around the perch, but with a little bit of looseness to allow the rotation.  Rotate the bird forward, pull out the bison tube, and sign the logsheet.

Birds are definitely the most commonly used animal for this method, at least from what I've experienced.  Here is another example of a bird geocache (which happens to be an exact replica to two bird caches I have seen) as taken by Wrapped In Piano Strings, who we should welcome to the geocaching world as this is a picture of their very first find:
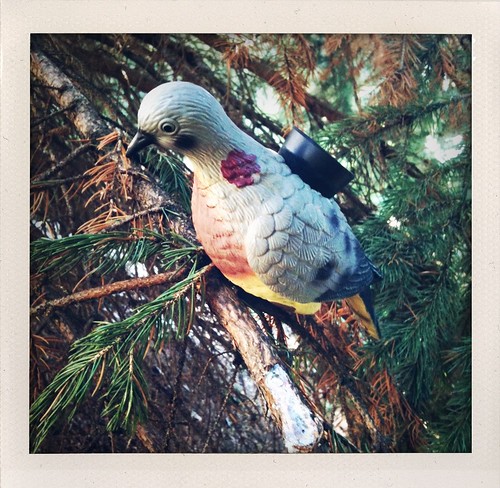
Once, I saw a large GINORMOUS Bison using this method up in St. Joseph, MO.  Always good for a laugh when taking someone to find it.

So there you have it.  Three ways to turn a simple geocache into a creative geocache using animals.  Have you seen an example of this before?  Post a GC code in the comments.

TripCyclone

P.S. I am waiting for permission from a few people to display their photos on the site.  I will update the post with photos as permissions arrive.  For now, I've merely linked to the photos I am awaiting permission from.

Thursday, November 26, 2009

Ant Hill Cache

Here at Creative Caches & Containers, we are not impartial to creativeness from outside sources.  We encourage you to let us know about your ideas so that we may help spread that creative nature to interested geocachers.  It is in that nature that we present this next idea straight from HeadHardHat (HHH), host of the geocaching video series known as GeoSnippits and the author of the GeoCache: I'm NOT Obsessed...Right? blog.  With his permission, we provide you with this video on how to design an Ant Hill Cache:


Let's quickly look at what is needed for this design:
  • Bondo
  • Bondo Hardener
  • A small bucket or cup
  • Latex or vinyl disposable gloves
  • Something to stir with (and disposable)
  • Spray Paint (textured, and roughly the color of ant hill sand)
  • Plastic 35mm film canister
Bondo is, simply put, a putty. But it's not like the Silly Putty that most people play with as a kid.  Bondo is a two-part putty.  This is because Bondo alone is okay.  But once you add the hardener, it hardens FAST.  And the more hardener you apply, the faster it will harden.  This is why you want the gloves.  It will harden to anything and you don't want it under your fingertips when it does.  Bondo was originally designed for automotive use and is commonly used in automotive repair.  But there are many other uses. Just looking it up I came across pictures of people who have used it to design creative outsides for their Wii, making hand holds for rock climbing walls, making a ceiling fan look like helicopter blades (complete with helicopter hanging below), and even for making buttons on a Guitar Hero controller that light up when you push the buttons.  There are likely limitless ideas for its use, so it's no surprise that it can be useful for making geocaches.

The video pretty much sums up how to make it, so I'm not going to go over that.  When I first saw this, I commented to HHH that most ant hills I've seen don't look so vertically tall.  Guess the North Carolinian ants are bigger. :P  But all kidding aside, you don't want to create an ant hill that doesn't look like the ant hills commonly seen in the area you want to hide the cache.  I've seen ant hills that look like his but half the size.  I've seen ant hills that are small in height but are wide and circular.  What we are going to look at now is how to modify the design to blend this cache in with the ant hills in your area.

First, you'll want to go out and find some ant hills as examples to see how you want yours to look in the end.  Part of why his is taller is because of the position of the 35mm film canister.  That's going to be hard to position any different.  You could use something smaller, but I have another thought that will help in making a smaller ant hill while not necessarily reducing the size of the container.

If you want to make one of these that doesn't stand up as tall, then don't build it around the cache itself, but around a cache holder.  Let's first look at some additional supplies that are needed.  First, you need to know what size container you are going to use.  Avoid anything larger than a 35mm film canister.  Try to aim for something thinner. The goal is to lay the cache on it's side inside the fake ant hill to reduce the height, but still allow geocachers to open the container.  Bison tubes, Advantex film canisters (more oval shaped than the 35mm kind), nanos, and other small containers will work well for this.

Once you have the size picked out, make a thin plastic sleeve that fit snuggly around the container.  If using a nano, you can also just get a magnet the same width as a nano.  You want this sleeve to fit snuggly to help hold the container in place, but still be able to remove it from the sleeve as needed.  If need be, you can try to hunt down some moldable plastic.  It's been a while since I've seen it in stores, but there is a product out there that can be heated up in boiling water so that it is moldable.  Take it out of the water, and within a few minutes it will harden into whatever shape you position it in.  I'll try to look for in the future, but if you know what I'm talking about, send me the info.  Once you have this mold made, you then just snap the container into the sleeve and you have a cache holder. When you apply the Bondo, this will take the place of the 35mm in the video.

For added measure, we're going to design a cover to go over the cache to help ensure it doesn't fall out by accident.  To do this right, you'll need to design this part first, before you make the ant hill.  Figure out roughly what size you want the base of the ant hill to be (width wise) and about how tall you want it to be.  Get some hard plastic and cut it out to be about that width of the base.  Then get a screw that will be a bit smaller than the planned height of the ant hill.  Put the screw through one end of the plastic piece.  Have this with you when you apply the Bondo.

Before apply the Bondo, have newspaper down like in the video.  Take that plastic sleeve that you'll use to hold the cache and place it on top of the plastic piece with the screw.  Make sure it's not right up against the screw.  Then place a small piece of newspaper between both plastic pieces, covering up the bottom piece, but with the screw poking through the paper.  You are doing this because you want the Bondo applied to both the sleeve and the screw, but not the plastic piece that is attached to the screw.  Now apply the Bondo.

When finished applying the Bondo, and once it's hardened, remove the small piece of newspaper that you placed between the two plastic pieces.  If designed right, this will create a plastic cover that can be rotated open to expose the cache inside, and rotated closed to help protect the container from falling out.  This won't protect against the elements, so make sure that the inner container can be sealed.  If the shape isn't quite what you want, sand any undesirable parts away.

Now all that's left is to apply the spray paint.  As HHH mentions, use a textured spray paint.  Try to find one that closely matches the color of the ant hills in your area.  Paint it, let it dry, and there's a modified Ant Hill Cache.

Thanks to HeadHardHat for making this video.  It really shows how some creativity can produce interesting cache designs.  Keep up with his blog for some great general geocaching tips.