Showing posts with label magnetic. Show all posts

Sunday, April 18, 2010

An Electrical Plate

Some of you may have seen this design before.  It isn't anything new.  But it is easy to build and it makes a great example of creativity.  Before we begin, let's look at what materials you'll need.

Materials:
  • Electrical Wall Plate
  • 2 magnets
  • Metal Epoxy
  • Small baggie
  • Logsheet
Most of the materials can be found in a hardware store.  However, most magnets you would find in a hardware store are larger and thicker than what is best to use.  For my magnets, I rely on Grainger due to the variety of different styles and sizes.  The only problem is that they usually require an account for most products they sell, especially magnets.  They are considered hazardous materials.

When you go to buy the wall plate, make sure that whatever you buy is the style of a wall cover with two holes for the screws.  For hiding outdoors, the metal variety will blend in better than plastic.  For magnets, I used a nickel plated, neodymium magnet that is .375 mm wide and .100 mm thick.  For a glue, I used a Metal Epoxy to better grip the metal between the two objects.  It is also fast drying and holds up to weather a lot better than normal super glue.  You will need a small baggie for this design.  Look in the bead section of any arts & crafts department/store to find cheap bags (50-100 for less than $2.00).

Here is an example of the Wall Plate alongside the magnets.  Notice one magnet covering the left hole.

With this image, you can easily see how everything will fit together. The magnets cover the holes on the backside of the plate.  All you need to do is glue them down.

Metal Epoxy works by mixing two substances.  One is a hardener and one is a resin.  This typically comes in a special container that looks like two syringes fused together.  Make sure you have a disposable container handy and something small and disposable for mixing the materials.  Open the container and carefully squeeze a small amount of both materials into the disposable container.  One of the materials will move rather slow.  I used my mixer to scrape the glob off the tip of the syringe.

Once you have the two materials in your container, you only have about five minutes to work before it becomes hardened enough that you can't easily apply it.  Quickly mix them until they have a uniform color and consistancy (about 30 seconds of stirring should be minimum).  Then, carefully begin applying the epoxy.  Use a little bit on the front side of the hole to seal that up, evening it flat with the rest of the plate.  Apply more to the back side, this time to the gap between the magnet and the plate.  Apply it a big thicker so that it can drip fully into the gap.  Apply it around the entire magnet and once you feel satisfied, you're done.

Here is what it should look like on the backside when you are done:

Now I recommend that you only do one magnet at a time. In the amount of time it takes to mix and apply the epoxy to one magnet, the rest of the epoxy will have dried out too much for easy application to the second magnet.  Once you are completely finished preparing the cache, allow at least one hours before handling it.  For the best strength, allow a full 24 hours before use.

This cache, as you might already be able to tell, works best in locations where an electrical face plate would seem likely (and not dangerous to the cacher who goes after it).  Since the epoxy dries a different color, you might look into a metal looking spray paint to blend the in the front side.  If placing this in a location with a different color than the face paint, definitely consider spray paint.

Once you have the location picked out, place a logsheet into one of the small baggies and place the baggie between the two magnets on the backside.  You will have to rely on the object you are attaching too to hold the baggie in place with the above design.  However, you can always consider modifying the design to hold the baggie into place.

A rather simple design, but also a devious design.  Even experienced cachers can overlook this one at first.  So find a good spot to hide it and enjoy the logs.

TripCyclone

PS: Watch your fingers handling the wall plate.  The edges are sharp.  I accidentally cut my thumb while trying to clean off some excess epoxy because I didn't have a good grip.

Sunday, November 15, 2009

An Attractive PVC Cache

Today, we are going to look at a cache that is similar to a design we've looked at before.  The difference is we've made it a bit larger.  You'll need some supplies for this one so let's look at the essentials.

  • A piece of PVC pipe, about four feet long
  • Post-hole Digger
  • Power drill and some drill bits (read below to figure out what sizes)
  • A bolt, two washers and two nuts (see below for details)
  • A tube shaped cache, small or micro sized
  • A magnet
  • Superglue (preferably a kind that's designed for outdoor use)
  • Logsheet
Before continuing, let's look at the post-hole digger requirement.  For this cache, it is imperative that you not only have permission for the location the cache will go in, but that whomever gives you permission understands that you will need to dig a small hole (no more than a foot deep).  DO NOT place this in a location where you don't have that permission.  Don't worry, you aren't burying the cache.  It will make sense in just a bit.

When you are ready to get supplies, the first thing to decide on is the cache container.  You will need a tubular shaped cache.  For our design, we'll use a waterproof matchstick container.  They are easy to find in any camping store or department.  The reason we need to figure out the cache container first is that the width of the container will help us pick the PVC pipe you'll need.

The cache will need to fit easily inside the PVC pipe, so after you figure out what container you are using, either measure it's width or take it to the hardware store with you.  You need a section of PVC pipe that is at least a half inch wider than the cache container.  Also, make sure it's about four feet in length.  You can bump that to five feet if you'd like.  

Next, we need a magnet.  Aim for a magnet that is between half as wide to the full width of the cache container.  Try not to get one that is wider than the magnet, or else you'll need to widen the PVC pipe to account for that.  Just make sure you have some superglue (or another adhesive) designed for outdoor use.  You may want a second one, and we'll come to why later.

Last of all, the bolt.  You need to get a bolt that is wider than the PVC pipe.  Aim for one that is about two - three inches wider.  Get washers and nuts to go with it, and make sure you have a drill bit wide enough to make a hole for the bolt.  There is one more thing.  If you can, get a bolt made from a non-magnetic metal.  There are some out there, you just have to look.  If you can't find one, then scrap the second magnet I mentioned in the above paragraph and talked about below as it will actually hinder the cache.

Now you should have all the supplies you need.  Let's start building by attaching the magnet to one end of the cache.  I would suggest attaching it to the end of the container opposite the lid.  You don't want someone to accidently remove the magnet.  Be thorough with gluing it on.

While that is drying, let's get the PVC pipe.  You'll need to place about a foot of this into the ground so measure a foot from one end of the pipe and mark that spot with a line around the pipe.  Next, measure about one inch further up the pipe and mark that spot with two dots on opposite sides from each other.  Measure another inch and repeat.  Do this two more times.  You will drill holes through each of these dots.  Two of the holes need to be drilled wide enough to fit that bolt we talked about.  The bolt should not be placed in the bottom set of holes.  Ideally, try to place it in the last set, farthest from the line.  The remaining holes are the drainage holes, hence why you want the bolt in the highest set of holes.  When you put this pipe into the ground, those holes will help make sure the pipe can drain any water that collects inside.  The bolt will help hold the cache up out of the water when the pipe fills.

By now, the glue is likely dry (unless you used Gorilla Glue).  Grab the newly drilled pipe, your post-hole diggers, the cache container, and a logsheet.  I'd recommend a small baggie for the logsheet (can be found in any crafts store or department near where they have bead supplies).  Time to go to the cache site.

At the selected cache site, you'll need to dig that hole. This is why you need permission.  Once you have the hole dug, pack some of the dirt into the end of the PVC pipe that you measured.  Try your best to keep this packed dirt under that line, as you want to keep those drainage holes clear of dirt.  If you can, use something to stick in the top of the pipe to help pack down the dirt at the bottom, be it a stick or a hiking pole.  Once this is ready, stick the pipe into the hole and fill the surrounding hole up with dirt.  If done right, the line you drew should be level with the ground.  Make sure you pack down the dirt to help secure the pipe.  If you are able to find a spot close to a fence or other structure, you can even help tie the pipe to that structure to help hold it up.

Now for the tricky part.  Make sure you place the geocache into the top of the pipe so that the magnet is facing up.  For security purposes, you can always attach a magnet at both ends of the container just in case a geocacher puts it in upside down.  But don't do this unless you can get a bolt that won't attract magnets.  If you do, and you place a container with magnets on both ends into the pipe, the bolt will grab hold of the magnet and nobody will be able to retrieve the cache.  If you are forced to use a bolt that will attract the magnet, make sure to include a line in the cache description about being careful replacing the cache (you don't have to say way, just that they need to be careful).

The cache works like my Magnetic Micro cache, but on a larger scale.  A geocacher will have to bring something that they can lower down into the pipe to "Attract" the magnet on the geocache, then pull it up to retrieve.  Now it should make sense why we placed drainage holes and why we put the bolt in there, alongside why I made a big deal about the magnetism of the bolt and using two magnets.

Oh, and you can easily modify this one a bit.  Here is a design that MrDSW took of just this kind of cache (used with permission):

Note that the pipe used is attached to a girder for stability.  Also, the unique idea of placing this lure makes it feel more like fishing, which is essentially what geocachers will be doing.  If you look carefully at the cache container, you can get an idea of how they built it using PVC parts, a hook to attach to the hole at the back of the lure, and the tongue of the lure to attach the magnets too.

There are some other variations of this design, which I'll introduce in the next post.

By the way, I mentioned designing log books in my last post.  Sorry I haven't posted since as I've been busy, but that is on my list.  I'll give you a quick preview here: LOGBOOK SNEAK PEAK

TripCyclone

Monday, September 28, 2009

A Magnetic Micro

Magnets.

They can be so much fun to play with on a rainy day. That is, until you hold one up to something that can be damaged by a good magnet.

They can also be very useful for geocaches. Today, we will be building a simple micro cache. The nice thing about this design is that it is reusable in a variety of ways, which we will look at in the future as well. Today, we will examine building the design.

Most of the supplies for this design are simple and could probably be easily found. One piece is not something you will find readily available at the nearest Wal-mart. Let's take a look:

* Superglue
* Magnets
* Logsheet
* Micro speciman container

It's the last one that is hardest to find. The ones I have actually came from a cache that was full of them for people to grab and place as a new cache. I believe it is a type of speciman container, used in science to collect and store samples. This is what it looks like:


If you look carefully at the log sheet, you can see that this container is quite small. Just barely big enough to roll up a single micro log sheet and slid it inside. Now, look at the front end of this. See the impression? Before you get a magnet, you need to make sure you know the width and depth of this impression. This way, when you acquire the magnet for this cache, you get the right size.


Getting the right magnets is important. I've mentioned it before, but we'll quickly refresh. Look for some kind of neo-dymium magnet. They are quite strong for their size and are inexpensive too. Hardware stores are your best bet, and even through them you are likely to have to order them. Grainger Industrial Supply is the store I went through, and I was able to buy 20 magnets for $10. The downside for many is that they will require you to have an account with them before selling these magnets as they are considered hazardous.

Once you have the magnets and the cache container, all you need is some superglue. Get the supplies together and let's begin.

First, decide which side you want the magnet on. The design of my container requires me to use the impression in the lid. The bottom of the container doesn't provide enough surface to attach the magnet.

Next, apply a small amount of superglue where you want to attach the magnet.

Last, attach the magnet and let it dry. It should look like this:


If you look carefully at this image, you'll notice that the magnet doesn't quite fill the width of the lid. There is a small gap. To help reinforce the magnet, I applied a tad bit more superglue into that gap. You have to be careful that you don't put too much glue. I was just barely squeezing the tube as I circled the magnet. This little bit extra glue helps secure the magnet just a bit more.

There, now you have a container that can be used in a variety of ways. Now we'll come back to this design in the future with some other ideas, but lets look at a simple way to hide that will confuse a lot of people when they first approach the cache site.

For this part of the design, you need to find a place where this is a thin, hollow tube. It is preferable if the tube is not too long. About the length of a pen is good. With regards to the thinness, it needs to be wide enough to fit the cache container, but not wide enough for someone to reach into it and grip the container. Ideally, it will be just wide enough to easily slide the container inside. This container is realitively waterproof, so if the tube is vertical, it should be okay. However, if vertical it allows water to fill up the tube and depending on how deep it is, it could float your container to the top so this should be taken into consideration. To avoid this, try to find a tube that is horizontal.

Now, here is the tricky part. You want to insert the cache container into the tube with the magnet facing out, not in. This is critical to the design. The idea is that once the geocacher figures out where the container is at, they now have to figure out how to get it out. The way to do this is to stick something metal into the tube to magnetically "grab" the cache container, and pull it back out. And not just any metal. Some metals are unresponsive to magnets. If the geocacher doesn't have the right metals with them, they won't be able to retrieve the cache.

By now, you're probably thinking "Now THAT's evil!" Yep...and a good example of how to be creative with the cache hide. I have seen this before and it had me stumped for a while. The hint helped, but until I began thinking outside the box, it had me going in a totally wrong direction. This hiding trick is something else that we might revisit in the future, but on a larger scale.

TripCyclone

Sunday, August 30, 2009

A Nano in the Woods

Nanos.  Some enjoy them.  Many hate them.  The mere word makes some want to hunt down the guy who first introduced them to the geocaching world.  Some have never seen one before.  So how can we be creative with a nano?

Nano's are small caches about the size of the tip of your pinkie finger.  Magnetized on one end, they can fit in spots that many caches cannot even fit in and they are inconspicous.  Commonly, they are found in urban environments where someone wants to place a cache but most caches won't fit well.  For those who haven't seen one, here is what a nano looks like (with a penny for scale):

But a nano in the woods?  I must be crazy.  Well, I won't deny that statement but I will ask that you give me a chance to explain.  It is entirely possible to place a nano in the woods without people crying for your capture. It just takes the right cache design.  The design I'm going to share today can be varied as you desire, but it is one I have been working on for a while now.  Let's look at what is needed. 

First and foremost, you need a nano.  You can find them through many various geocaching stores, along with Groundspeak's own store.  They do cost a few dollars, and occasionally you can find deals if you buy a group of them.

Once you have the nano, the next thing you need is an ammo can.  Yep, I said ammo can.  You might be starting to see where this is going.

With these two items, you have the bare minimum needed for this cache.  Place the nano inside the empty ammo can and go find a good spot in the woods to hide the ammo can.  Cacher's will dread your nano and possibly give a huge sigh of relief, and maybe confusion, when they find the ammo can.  But, as always, there is a way to go an extra step.  This is where my design comes in.

For my idea, I've been spending the last several months trading swag for golf balls whenever I see one in a cache.  My idea, which you are welcome to use and modify if desired, is to get as many golf balls as my ammo can will hold.  I'm closing in on that goal.  Many are dirty so I'll take one day and clean them all up so they look as similar as possible short of brand design.  I've purposely passed up on colorful golf balls.

Next, I will begin the process of drilling out a hole in one of the golf balls.  The hole will need to be deep enough that I can fit a nano inside such that only the lid of the nano sticks out.  Then I need just a tad bit deeper.  This is so I can glue a magnet into the base of the hole.  I could stick the nano in further, but if I do, it will make it harder for geocachers to pull the nano out of the hole.  With the magnet in place, I can set the nano into the hole and voila...geocachers now have to search the ammo can for the golf ball that contains the nano.  You can see an example of how this would look to the left.

This is an idea that can be modified however you desire.  I've actually seen a variation with a homemade container for the nano to be housed in.  Don't want to use golf balls?  35mm film canisters can also work.  Just place a small pebble in each one so that a geocacher can't "feel" the containers for the one with the nano.

And that is how to place a nano in the woods that won't resort in your exile.

TripCyclone

Tuesday, August 25, 2009

Building Bolt Caches

Bolt caches are a great example of how to blend something in so well that few muggles will ever pick up on it's true intentions.  Many geocachers will get caught off guard by them too if they are well done.  But did you realize there are ways to get creative with just bolt caches?

Most geocachers will see only one type of bolt cache.  It looks like a simple bolt with a nut on one end.  Unscrew the nut to open the cache.  But let's look at it with a bit more detail shall we.


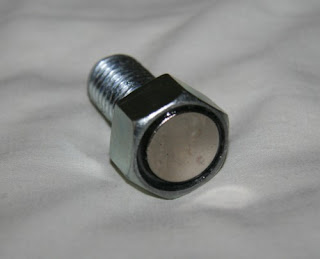
There are a few things you'll need if you want to build one of these.  You need a bolt, a nut that fits it, a magnet that fits either fits just inside the nut or over the nut, a logsheet, a drill and a drillbit for drilling metal.  Last of all, make sure to have some super glue.  You will also need a saw for cutting through metal. 

Let's start with the bolt.  It's easiest if you know where you are going to hide this first, as you can then get a bolt of the same size as what's found on that object.  This really helps blend it in.  It will also give you an idea of how far it sticks out.  You don't want the cache to stick out further than the real bolts.  Make sure that you try to find a spot that doesn't use really thin bolts.  The thinner the bolt, the harder it will be to build the cache and the smaller the log sheet will have to be.

Once you have the bolt, then find a nut to fit it.  This will be pretty easy.  Also, while you're at the hardware store, make sure you have a drill bit that will not only cut through metal, but also be wide enough to drill through the end of the bolt.

The hardest part of getting the supplies will be the magnet.  You can often find small round magnets at hardware stores, but usually in limited supply and often thicker than you really want to have.  You may have to order them from a catalog.  Ideally, you want to try and find neo-dymium magnets.  They are powerful and come in a variety of sizes and thicknesses.  You can go with thin or thick, but make sure it is just wide enough to fit inside the nut.  The more snug it is, the easier it will be to seal it.  Also, the thicker it is, the harder it will "grip" the surface it's place against. 

Once you have the supplies, you will need to figure out how long you want the cache to be and then saw off the head.  Then you need to drill a hole into the end of the bolt.  How deep you want to go is up to you.  You can cut the logsheet to fit the hole, but try and make it at least a half inch deep.  This allows a logsheet that gives room for people to sign the log.


After you have cut the hole, you will need to fit the magnet into the nut and seal it in with super glue.  Try to use super glue that works on metals.  Or, if you have something that works really well for you when gluing metals together, work with that.

Once this is all dry, slip a rolled up logsheet inside the bolt, screw the nut over the end and you now have a magnetized bolt cache.  Go hide it and enjoy the new cache.


But wait, I said there are ways to make this more creative.  How could you possibly make this more creative?  First, let's look at the typical way people find a bolt cache.  Most geocachers, if they begin to think it might be a bolt cache, will begin grab every bolt and see if anything moves.  Since the bolt cache is merely magnetically attached, it will come right off or at least move (if the magnet is good).  Here's where the creative part comes in.

One thing to do use find a spot where there are already bolts, but find an unused hole.  If there is one you can use, this opens up options.  Measure how thick the object is.  Figure out at what point on the future bolt is on the opposite side of the object.  For example, let's say you are using a bolt 3 inches long.  If the head is snug against the object this is attached to, then let's say the object is half an inch thick.  Measure from the base of the head to about 3 & 1/4 inches.  That is the spot that will most likely be covered by the nut.  Now, instead of sawing the head off the bolt, saw through the bolt at that spot.  Then drill the hole into one of the two pieces.  Now you have two options at this point.  You can use a wider nut and hold the two pieces together using just the nut, or glue two nuts together to provide enough room.  Just be warned that the latter option is more likely to stand out.  The advantage of this method...a geocacher can't just feel for the bolt that moves.  They would actually have to take it out to figure out it is a cache.  I've actually seen this done just once in my personal experience.

But now for the really tricky option.  The above ideas include drilling the hole through the end of the bolt.  Instead of drilling the hole through the end of the bolt, drill it through the side of the bolt.  Then use the nut to cover up the hole.  Since this is not the standard method of hiding a bolt cache it will help throw some cachers for a loop.  Combine in with the second idea and you'll have a devious cache.  If you really want to mess with your fellow geocachers, make it magnetic but hide more than one of these designs.  The fake ones don't need to have the hole drilled in them.  In fact, drilling the hole might entice a geocacher into thinking the logsheet is missing and they might "help you out" by putting one into the fake cache.

The last way to make a bolt cache interesting is to combine it with something else that blends in.  For example, combine it with a reflector on one end and attach it near other reflectors.  I have seen this one once before too.

Bolt caches are a fun way to safely hide a cache in plain site and have it be a bit more creative.  Are there other ideas for bolt caches out there that I haven't thought of?  Post a comment and explain.

I'm still working on a system of photos and diagrams.  I'll try to get those up soon.

TripCyclone