The latest in 3D Technology? What exactly do you need for THAT?
- A cache
- Logsheet
- Swag (depending on size)
- An actual wood log
- Power saw (type will depend on style)
- Something to use as a strap (hey...a strap might work :P )
- Screws
- Power drill
First, you need to figure out what kind of cache you are going to use. At a minimum, a micro can be used. I'd recommend at least a pill bottle, though a 35mm film canister might work. You can get up to ammo can size, though you will have to make sure the log you use is big enough. A stump might work well for an ammo can.
Second, you need to figure out where to make the cut. If it's a stump, the bottom is the obvious spot. If you're using a log, depending on the size you might want to see how it will rest on the ground first. You don't want to cut the hole, place the cache into the hole, then find out that it naturally rolls to the side and exposes the hidden cache.
Once you've figured out where to make the cut, you'll need to start the cutting process. Now, if you're hiding a cache like a pill bottle, a power sander might be an option, albeit a slower one. A jig saw might be a good all around saw to use whether the hole is round or rectangular. Just make sure you are securing the log somehow before you do any cutting. You don't want that thing to slip out from under the saw, and possibly risk the saw slipping and hitting you. Remember, no cache is worth slicing off parts of your body. Also, consider how much room you want the cache to have while resting in the hole. If you make the hole too large, the cache won't stay in place. If it is too small, people will have a hard time getting it out and putting it back in, until it's been done enough to wear down the sides of the hole. In the end, a measurement might be needed. Using a sharpie, mark the outline of the cache on the log, and cut along the outside edge of that line. That should be good.
Now that the hole is cut, put the cache together with logsheet and possible swag (if big enough) and place it in the hole. Now, go find a spot to hide the cache and enjoy.
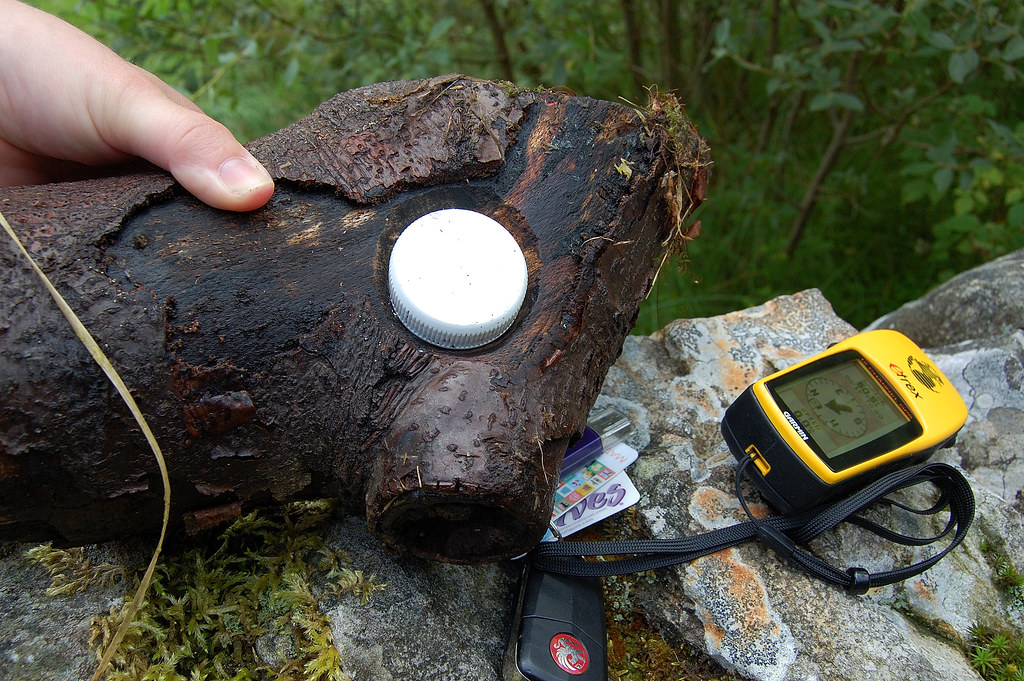
But what about those optional items? Well, over time, the cache container might slowly wear down the hole, making it easier to fall out. Or, you might have given it just a bit of extra room. We can fix this too. You will need something to use as a strap. You can find straps in the Sporting Goods stores or departments with camping gear. Rope may also work, but something flat like a strap is best. If you can search a bit, find a strap that will be wide enough to lay across the hole with the plastic fastener in the center of the rig.
Now, fasten the two pieces of the strap together and lay the strap ACROSS the cache, with either end extending out onto the wood and the plastic fastener in the center. On one side of the cache, about a half-inch to one inch from the cache, screw in a simple screw. Don't use a short screw, as you don't want it working it's way out too quickly while people retrieve the cache. Now do the same on the other side, screwing the strap securely into place.
In the end, the strap should lay out such that it holds the cache in place when latched shut. Then, when unlatched, each side stays screwed securely into the log. This whole extra step serves the extra purpose of holding the cache in place in case it loosens enough that it would fall out without the strap. Plus, as opposed to a similar design where you lift the log and the cache stays on the ground, when you lift the log up, geocachers will first look at the ground and see no cache. Unless they look at the log, they are likely to miss it, especially if the design is smaller. Tricky huh.
Here's one more picture of a similar design but with a larger container that I took a picture of:
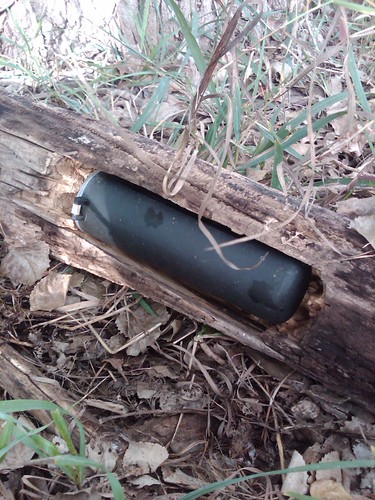
As mentioned, this design can work with a variety of sizes and shapes for the actual cache container. The container in the above picture is a paintball container. With the added "log" for hiding the cache, this also means you have a WIDE variety of locations you can hide this in the woods. This really helps allow you to pick just the right spot for the log. Then just work on how the surrounding brush can help blend the log in so that it doesn't stand out.
And that's how to build a "Log Cache". Enjoy.
TripCyclone


No comments:
Post a Comment