Monday, September 28, 2009

A Magnetic Micro

Magnets.

They can be so much fun to play with on a rainy day. That is, until you hold one up to something that can be damaged by a good magnet.

They can also be very useful for geocaches. Today, we will be building a simple micro cache. The nice thing about this design is that it is reusable in a variety of ways, which we will look at in the future as well. Today, we will examine building the design.

Most of the supplies for this design are simple and could probably be easily found. One piece is not something you will find readily available at the nearest Wal-mart. Let's take a look:

* Superglue
* Magnets
* Logsheet
* Micro speciman container

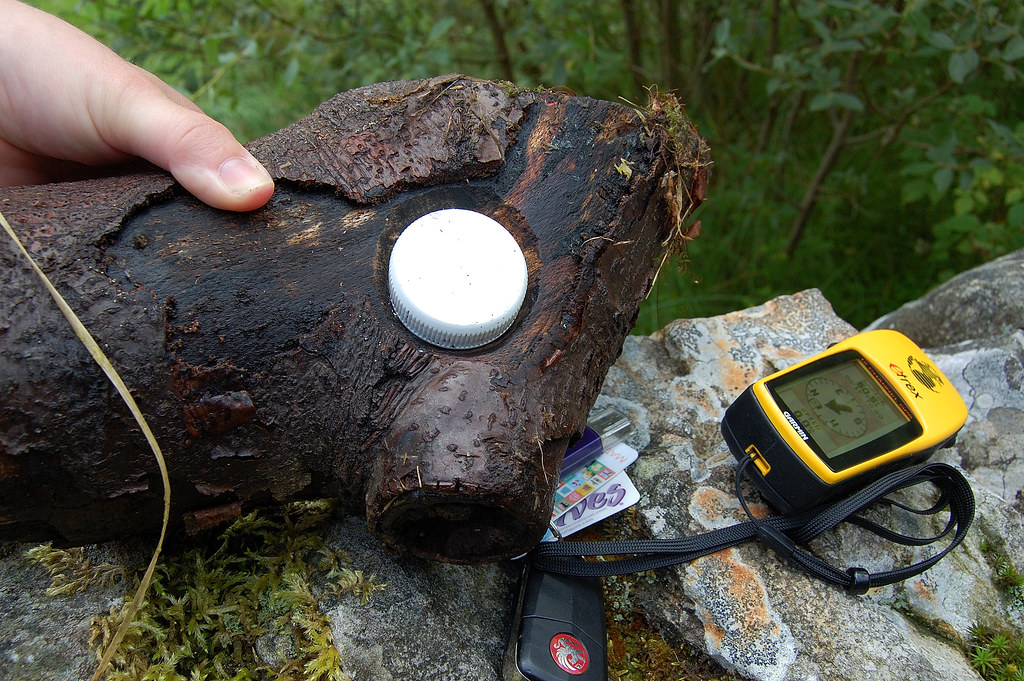
It's the last one that is hardest to find. The ones I have actually came from a cache that was full of them for people to grab and place as a new cache. I believe it is a type of speciman container, used in science to collect and store samples. This is what it looks like:


If you look carefully at the log sheet, you can see that this container is quite small. Just barely big enough to roll up a single micro log sheet and slid it inside. Now, look at the front end of this. See the impression? Before you get a magnet, you need to make sure you know the width and depth of this impression. This way, when you acquire the magnet for this cache, you get the right size.


Getting the right magnets is important. I've mentioned it before, but we'll quickly refresh. Look for some kind of neo-dymium magnet. They are quite strong for their size and are inexpensive too. Hardware stores are your best bet, and even through them you are likely to have to order them. Grainger Industrial Supply is the store I went through, and I was able to buy 20 magnets for $10. The downside for many is that they will require you to have an account with them before selling these magnets as they are considered hazardous.

Once you have the magnets and the cache container, all you need is some superglue. Get the supplies together and let's begin.

First, decide which side you want the magnet on. The design of my container requires me to use the impression in the lid. The bottom of the container doesn't provide enough surface to attach the magnet.

Next, apply a small amount of superglue where you want to attach the magnet.

Last, attach the magnet and let it dry. It should look like this:


If you look carefully at this image, you'll notice that the magnet doesn't quite fill the width of the lid. There is a small gap. To help reinforce the magnet, I applied a tad bit more superglue into that gap. You have to be careful that you don't put too much glue. I was just barely squeezing the tube as I circled the magnet. This little bit extra glue helps secure the magnet just a bit more.

There, now you have a container that can be used in a variety of ways. Now we'll come back to this design in the future with some other ideas, but lets look at a simple way to hide that will confuse a lot of people when they first approach the cache site.

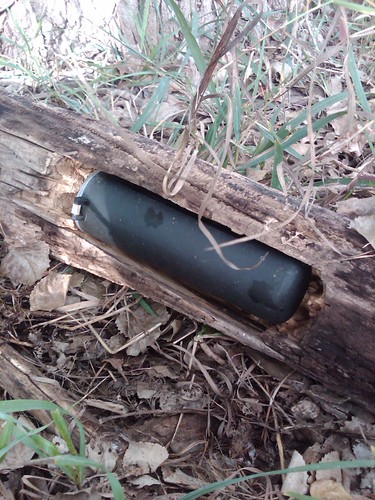
For this part of the design, you need to find a place where this is a thin, hollow tube. It is preferable if the tube is not too long. About the length of a pen is good. With regards to the thinness, it needs to be wide enough to fit the cache container, but not wide enough for someone to reach into it and grip the container. Ideally, it will be just wide enough to easily slide the container inside. This container is realitively waterproof, so if the tube is vertical, it should be okay. However, if vertical it allows water to fill up the tube and depending on how deep it is, it could float your container to the top so this should be taken into consideration. To avoid this, try to find a tube that is horizontal.

Now, here is the tricky part. You want to insert the cache container into the tube with the magnet facing out, not in. This is critical to the design. The idea is that once the geocacher figures out where the container is at, they now have to figure out how to get it out. The way to do this is to stick something metal into the tube to magnetically "grab" the cache container, and pull it back out. And not just any metal. Some metals are unresponsive to magnets. If the geocacher doesn't have the right metals with them, they won't be able to retrieve the cache.

By now, you're probably thinking "Now THAT's evil!" Yep...and a good example of how to be creative with the cache hide. I have seen this before and it had me stumped for a while. The hint helped, but until I began thinking outside the box, it had me going in a totally wrong direction. This hiding trick is something else that we might revisit in the future, but on a larger scale.

TripCyclone

Saturday, September 19, 2009

Log Caches

How about a design that works with ANY size and shape of cache container?  Well, almost any size.  It might not work so well with large ammo cans or larger.  It's a simple design, can go in a variety of places, and it will still make people think a bit at times.  Oh yeah, I should also point out that this design employs the latest in 3D technology to camo the container.  Intrigued?

The latest in 3D Technology?  What exactly do you need for THAT?

  • A cache
  • Logsheet
  • Swag (depending on size)
  • An actual wood log
  • Power saw (type will depend on style)
Optional items:

  • Something to use as a strap (hey...a strap might work :P )
  • Screws
  • Power drill
Before we look at the design process, let's look at an example of the final design.  This photo was taken by Gordon McKinlay (used with permission).


The basic design is to cut the log to fit the cache.  Hide the cache in the hole, place on the ground upside down, and you have a hidden cache.  Let's look a little more closely at the process.

First, you need to figure out what kind of cache you are going to use.  At a minimum, a micro can be used.  I'd recommend at least a pill bottle, though a 35mm film canister might work.  You can get up to ammo can size, though you will have to make sure the log you use is big enough.  A stump might work well for an ammo can.

Second, you need to figure out where to make the cut.  If it's a stump, the bottom is the obvious spot.  If you're using a log, depending on the size you might want to see how it will rest on the ground first.  You don't want to cut the hole, place the cache into the hole, then find out that it naturally rolls to the side and exposes the hidden cache.

Once you've figured out where to make the cut, you'll need to start the cutting process.  Now, if you're hiding a cache like a pill bottle, a power sander might be an option, albeit a slower one.  A jig saw might be a good all around saw to use whether the hole is round or rectangular.  Just make sure you are securing the log somehow before you do any cutting.  You don't want that thing to slip out from under the saw, and possibly risk the saw slipping and hitting you.  Remember, no cache is worth slicing off parts of your body. Also, consider how much room you want the cache to have while resting in the hole.  If you make the hole too large, the cache won't stay in place.  If it is too small, people will have a hard time getting it out and putting it back in, until it's been done enough to wear down the sides of the hole.  In the end, a measurement might be needed.  Using a sharpie, mark the outline of the cache on the log, and cut along the outside edge of that line.  That should be good.

Now that the hole is cut, put the cache together with logsheet and possible swag (if big enough) and place it in the hole.  Now, go find a spot to hide the cache and enjoy.

But what about those optional items?  Well, over time, the cache container might slowly wear down the hole, making it easier to fall out.  Or, you might have given it just a bit of extra room.  We can fix this too.  You will need something to use as a strap.  You can find straps in the Sporting Goods stores or departments with camping gear.  Rope may also work, but something flat like a strap is best.  If you can search a bit, find a strap that will be wide enough to lay across the hole with the plastic fastener in the center of the rig.

Now, fasten the two pieces of the strap together and lay the strap ACROSS the cache, with either end extending out onto the wood and the plastic fastener in the center.  On one side of the cache, about a half-inch to one inch from the cache, screw in a simple screw.  Don't use a short screw, as you don't want it working it's way out too quickly while people retrieve the cache.  Now do the same on the other side, screwing the strap securely into place.

In the end, the strap should lay out such that it holds the cache in place when latched shut.  Then, when unlatched, each side stays screwed securely into the log.  This whole extra step serves the extra purpose of holding the cache in place in case it loosens enough that it would fall out without the strap.  Plus, as opposed to a similar design where you lift the log and the cache stays on the ground, when you lift the log up, geocachers will first look at the ground and see no cache.  Unless they look at the log, they are likely to miss it, especially if the design is smaller.  Tricky huh.

Here's one more picture of a similar design but with a larger container that I took a picture of:


As mentioned, this design can work with a variety of sizes and shapes for the actual cache container.  The container in the above picture is a paintball container.  With the added "log" for hiding the cache, this also means you have a WIDE variety of locations you can hide this in the woods.  This really helps allow you to pick just the right spot for the log.  Then just work on how the surrounding brush can help blend the log in so that it doesn't stand out.

And that's how to build a "Log Cache".  Enjoy.

TripCyclone

Monday, September 14, 2009

Placing a Night Cache

Okay, I'm going to be stealing a bit from an article I wrote on my personal blog at the beginning of 2009.  This is only because I've laid out how to build a night cache already.  However, I will add a few things here before I send you over to look at that article.

So why am I doing this?  This past weekend, while at the 6th Annual Kearney Picnic in Kearney, NE, a group of us went after a night cache.  Since it has been a week since my last post, I felt that this is a good time to update a bit of information about night caches.  Especially since I am working on building some night caches for one of my own upcoming events. Let's take a look at what supplies you need to build a night cache:

  • Cache container (try to use at least a small since you'll be in the woods)
  • Logbook
  • Flashlight
  • Reflective tacks
The most critical part of building a night cache are the reflective tacks, often called "Fire Tacks".  You can find basic sets of these at most outdoor stores, like Bass Pro or Cabela's.  I've started to see them in outdoor departments at more common stores like Target and Wal-mart.  Usually, you'll find them amongst the hunting equipment.  Why is this?  Well, this product is a common product for hunters to use to find their way to their favorite hunting spots at night.

You can also look online.  Wildtech Corporation deals in fire tacks of various designs.  It is one of there products that I finally got to see in action this last weekend.  They sell tacks in 3D (pyramid shaped), 4D (cube shaped), and they even sell "Fire tape".  Their products also come in different colors, including a Stealth color designed specifically for geocachers.  I've seen the stealth color before and boy does it blend in during the daytime.  This weekend, I saw the 4D design.  Wildtech's tacks are smaller than the round tacks you'll find in stores, but they are bright and quite visible even at a distance.

As I talked with some fellow cachers, I will update one thing about the post I'm going to send you to.  Placing the tacks at night is an effective way to verify that standing at each tack allows you to see the next one.  On the other hand, you can also effectively place the tacks during the day.  While it is harder to see the tacks at a distance, you can definitely see what you placed it on.  The only thing to remember is that if you do place the tacks during the day, MAKE SURE you go back out at night at least once before you submit the cache to Geocaching.com so that you can make sure that others will be able to follow the path.

One last warning.  This article was written both to explain what a night cache is, but also how to both find one and build one.  The article is lengthier as a result of all of that information included.  With the number of times I've heard geocachers say they enjoy night caches, it's hopefully enough information for you to build your own.  I have three in the works myself.

Go to "What Are Night Caches?" to read the article.

Next, we'll talk about building Log Caches.

TripCyclone

Monday, September 7, 2009

Building a 35mm Film Cache

I know what you're thinking.  "Why is he talking about building a 35mm Film Cache.  That's so simple and uncreative."  Well you are right...if you are thinking of a traditional film canister hide.  This one is a bit different, and it can be used in a VARIETY of ways and with traditionals, multi's, or puzzles. Uncreative...HA HA HA!

Let's look at the materials needed:

  • 35mm film canister
  • Micro log sheet
  • Tape
  • Scissors
Before we deal with how to build this, let's look at that first item.  A 35mm film canister.  Now you're probably thinking of the small plastic container that film comes in.  That's not what I'm talking about.  Instead, you need the metal container that the film is actually housed in.  The piece that would go into the camera itself.  For the young ones out there that don't remember film cameras, it looks like this:

Whether you regularly use film or not, chances are you aren't going to have these sitting around the house.   So how do you get your hands on some?  The best place is a film developing center, or a 1-Hour Photo Processing store.  While getting my hands on some, I went to CVS, Walgreens, and Wal-mart.  Many 1-Hour Photo stores will have some kind of system set up where they can get some money back if they send in boxes of used film canisters and those plastic film containers.  At least it used to be like that.  The CVS and Walgreens I went to seem to throw them away.  Good thing Wal-mart still recycles them.  Way to be green Wal-mart.  If you go to the photo lab and politely ask them for either item, usually they are willing to give you a handful.  If they look at you weird and ask why, you can always tell them what they are for or you can tell them something else.  As a science teacher, I can easily say that I'm using them for class and they don't have any more questions.  You can also tell them they are for an art project, or that you use the plastic containers to store things like tacks and paper clips.  A simple reason will usually suffice.  Just make sure the metal film canister (like the one pictured above) has that small piece of film still sticking out and it isn't damaged.  That's important.  From here on out, when I refer to film canister, I'm referring to the metal item in the pictures.

Now that you have the metal film canisters, let's make sure you have the other supplies.  For tape, any tape will do.  I used packaging tape only because all my scotch tape is back at work.  Lay out your supplies in front of you and grab the log sheet.  Depending on your log sheet, figure out which end is the top and which end is the bottom.  Grab the bottom end and line it up with the small tab of film sticking out of the film canister.  Now you need to tape the log sheet to the piece of film.  It can overlap a bit if you want, or you can do it end to end.  Use a small piece of tape and wrap it completely around to secure the paper to the film canister.  When you're done, it should look like this:


Once you have the log sheet securely fastened, carefully insert the film back into the canister.  You might have to work it just a bit if the tape/logsheet/film part is a bit thick, but you should be able to get it in without damaging the container.  If you look at the above picture, you might be able to see that I overlapped the paper and film, and it still went in.  Once you have the paper sticking in, find the round, notched gear on the side of the film canister (you can see it on the right in the above image).  If you are holding the film canister like you see in the above picture, rotate it counter-clockwise (backwards) until it begins to retract the log sheet.  Keep doing this until you get near the end of the sheet.  Like this:
 
You now have a 35mm film cache. Pull the tab out, sign the log, roll it back up.  You might want to put a small label on the film canister that points to the gear with instructions on how to roll it back up.  But what if a geocacher rolls it too far?  Well, there's a way to help protect against that too.  One thing is to put a label on the end of the log sheet that tells them when to stop rolling.  However, if the geocacher isn't paying attention, that won't help much.  So here's something else you can do. 

Get a small piece of paper, no wider than the logsheet.  You can always cut up a log sheet to about 1/3rd of it's original length. Then carefully fold up BOTH ends towards the middle, making a small thick tab.  Then, slide that over the end of the log sheet that sticks out and tape it down.  You've effectively made a brake for the log sheet.  As it is rolled up, when that hits the thin slit that the paper goes into, it will be too big to go any further, stopping a geocacher from rolling the log sheet up inside the container (which you will not easily get out unless you are familiar with working in a photo lab).  In this next picture, I've highlighted where I installed this "brake" in black:


So how would you use this idea?  Well, you can take any traditional 35mm film canister cache and put one of these inside to make it just a bit different. Those cachers expecting a baggie and a log sheet will be surprised at first.  But that's not all.  How about using it as part of a multi?  You can type up a message with the coordinates to the next stage and build one of these. Pull out the tab, get the coordinates, roll it back up and move on.  Maybe your stages involve answering questions.  This is an easy way to spice up the stages a bit.  One idea, that would seem strangely appropriate, is to use them in a multi with a "spy novel" element to them.  Sort of like finding a microfiche container that contains the secret clue to the mystery.  There are lots of ways you can incorporate this design into a variety of hides.

!!!WARNING!!!

This container is NOT a good stand-alone cache.  The very slip in the container that allows the logsheet to come out will also let in moisture, especially with part of the paper sticking out.  That will absorb the moisture and provide it with an easy path to travel inside the container.  So any use of this design will require another container to put it into.  You can try using Rite-In-Rain paper, but moisture might still be a problem.  Now, I haven't tested this, so it's possible that it does better than I expect.  But then you also have the issue with potential rust.  Hmmm...maybe that's something I should test.  I have plenty of spares.


Any other ideas out there for how to incorporate this into a cache?
TripCyclone

Sunday, September 6, 2009

What is this?

Sometimes, having a creative geocache isn't about how well you can hide it or what the geocacher has to go through to find the geocache, but about the site itself.  You can hide an ammo can out in plain view and people will still talk about how cool it was.  It takes the right frame of mind when designing it. Slick 50 had that frame of mind when she placed her second geocache.  The geocache is called  Charlie Brown

Let's take a quick look at the supplies needed for Charlie Brown before we examine how it was built.

  • Ammo can
  • Swag
  • Logbook
  • Christmas Ornaments
Wait.

That has to be wrong.

Christmas Ornaments?

Well, surprisingly enough, THAT is where the creative part came in.  But before we move on, let's hop into a Delorean and go back to 1965.

In 1965, a small Christmas special was aired and became a quick hit.  It was called "A Charlie Brown Christmas", and it quickly became a classic.  One of the main plot points of the film was a tiny, decrepit, baby tree that Charlie Brown picks to use as the tree for the school play.  The tree looks bad, and when decorated, it looks like a dinky little tree with those colorful ball ornaments.  I still remember watching this movie as a kid.  I'm sure many of you remember watching this when it aired each year.  Time to leave 1965.  Punching in time coordinates for late November, 2007.

Slick 50, a geocacher in the Dallas, TX area, was looking to place her second geocache.  With the desire to place a Christmas cache, and hearing about an idea from another Dallas geocacher by the name of Caveman2040, she began thinking of a name.  Charlie Brown.  Once the name came about, the rest of the design suddenly became clear.  She looked for the scraggiest tree she could find that was hidden from view of muggles, and went to work.  Placed in a park along Lewisville Lake in North Dallas, the cache is just a little ways off of the main trail.  When you get close, you have to bushwhack just a bit to get around some large trees, but once you do, you'll be greated by this:


Now, looking at the photo just doesn't really give the same impression.  This is partially a result of when the photo was taken.  This was taken in January, when many trees are missing their leaves.  As a result of this, much of the background blends in and makes it hard to see the tree in question.  Let's just say that as soon as I came around the nearby trees and saw this one, I just about died in laughter.  It was a great display and totally fits with the above film.  This is a perfect example of how the name of a geocache can be just as valuable as the cache itself.  I'm not sure it would have had the same impression if it had been named anything other than Charlie Brown.

Decorating this tree was nothing more than putting up the ornaments.  But Slick 50 went the extra step and attached some fake holly to the top of the ammo can, which is in plain site at the base of this tiny, three foot tall tree.  Punching in time coordinates for present day 2009.

I'm not really sure anything else needs to be said about how this was set up.  It's a pretty simple hide.  But above many of the geocaches I've found, this definitely demonstrates how the site itself can make a geocache not only creative, but memorable.  Since I found this, I've frequently referenced it when talking about memorable geocaches.  The only downside of this cache is that it doesn't get visited enough.  I'm amazed that in the almost two years since it was placed (November 2007), it has only been found 19 times.  That number should be higher.

By the way, Slick 50 has a few other holiday themed caches in the North Dallas area: Halloween, Easter, and Valentine's Day.  I guess I have a few others to go after next time I'm in Dallas.

Here's one more view of the cache:


TripCyclone

PS: A thanks to Slick 50 for letting me write about her geocache Charlie Brown.

Wednesday, September 2, 2009

A Puzzle Cache for Kids

Creative Caches & Containers isn't just about the containers.  It's about how the caches are done too.  This next design is more about how the cache is done instead of how the container is built.  And the best part...it's a great design for kids.

Puzzle caches can often be the bane of many geocachers.  Some are easy, many are hard.  The difficulty is usually dependant on the geocacher.  If you like puzzles and do them regularly enough, you'll learn some tricks and can often see things others may not.  Despite how puzzle caches are defined in one category, there are different types of puzzle caches of varying degrees.  The automatic lumping of all puzzle caches into an ignore list often results in overlooking puzzles that can be both easy and fun to do.  If you really want to hear my thoughts on this one, check out my post about puzzle caches called Ahhh...the Dreaded Mystery Cache, where you can find my own list of the different types of puzzles out there.  Today's idea is a great example of what can be overlooked by ignoring puzzles.

Before explaining the idea, let's look at the materials list:
  • 1- small or regular sized cache container
  • 1- cache container of any desired size (since this is a kid friendly cache, aim for this one to hold some swag)
  • 1- ziploc baggie, or a small tupperware container (must fit into the first cache container listed above)
  • 1- 50 piece puzzle, small (preferably one small enough that the finished puzzle is smaller than the side of an ammo can).
  • 1- log sheet or log book
  • Random swag (if desired)
  • 1 sharpie
Now, it's important to point out what I wrote in parenthesis and why.  Today's design is meant to involve two stages.  Because of this, it's important that the first container in the list is at least a small container.  It's actually better if you can use an ammo can, and you'll see why soon.  The second container is whatever you want.  But if you want to aim for this to be a kid friendly cache (read on), don't use micro's or nano's.  The ziploc baggie or small tupperware mentioned is for holding the pieces of the puzzle.  For the puzzle, go to a toy story or a toy department and look for small puzzles.  For the one I have, the box is about the size of a thick deck of cards and when put together, can easily fit on the large side of an ammo can.

Now for the design.  Before you can truly make this puzzle, you need to have found where you want to place the final cache and have collected the coordinates for that location.  If designing with kids in mind, try to pick a place that parents will feel comfortable taking kids.  The side of a cliff overhanging a creek or stream is probably not a good spot.

Once you have the coordinates, now you can begin making the cache.  First, open up and put the puzzle together.  If using an ammo can for the first stage, put it together on the side of the ammo can.  This will help you visualize how geocachers will do the cache out in the field.  Once you have it put together, carefully pick it up and flip it over.  I used a small cutting board to slide it off the surface I was working on and flip it over all in one piece.  Here is an example of where you should be at this point:

Now for the part where you turn this into a puzzle.  In large letters, use the sharpie to write a message on the back of the puzzle.  You can include what the geocacher is looking for, but make sure to include the final coordinates.  Make sure to spread out your writing.  You want as many pieces as possible to including writing.  You can do this by using a single letter for each puzzle piece, or by writing across multiple pieces so that the letters are only visible when they are joined together.  The more pieces with some form of writing on them the better.  I've prepared a picture of what this might look like (disclaimer: the coordinates listed are false coordinates and do not belong to an actual geocache):
 
Once the writing dries (which shouldn't be more than a minute or two if using a sharpie), then go ahead and take apart the puzzle.  Now, using a ziploc baggie or a small tupperware container (if your first stage is an ammo can), package up the collection of puzzle pieces.  At this point, I would recommend typing up a small sheet to put into the container with the puzzle, containing instructions for the cache.  For example:
Puzzle Instructions:
 Welcome to _________ cache.  To solve this puzzle, you will need to put together the following puzzle.  The puzzle is small enough that you can use the ammo can as your surface.  On the back of the puzzle are the coordinates to the final cache.  Please make sure to be careful with the pieces and that all pieces get back into the puzzle so that the next geocacher can have the same experience.  There are fifty pieces.  If any pieces are missing, please notify the cache owner.  Enjoy.
As you can see, this not only helps let the cacher know how to get the final coordinates, but it is also a reminder to carefully put all puzzle pieces back.  I'd recommend putting this in an easily visible spot, such as with the puzzle pieces.
At this point, your puzzle is ready to go.  Just put the puzzle pieces' container inside whatever you are using for stage one.  Get your final stage ready to go with the log book and whatever swag you want to use.  Go out and place your final and find a nice spot somewhere else in the area for stage two.  If designed for kids, try to not make cachers walk large distances, a half mile round trip is probably the maximum you want to make this...a quarter mile round trip is great for kids.  Try to avoid making the kids go through heavy bushwhacking.  If there's a trail nearby, even better.  This might not work great for an urban environment, but parks, especially if it's a larger park that has trails and a playground is great for parents taking their kids geocaching.  Get the coordinates for stage one and you are ready to go home and submit your cache.
Whether you want to explain how the cache works on the cache page or not is your own choice.  You might want to try and at least mention that this is a kid friendly cache.  If you want to put a reminder about being careful that all elements of stage one get back into the container, go ahead.  Don't forget, this is a puzzle cache.  Make sure you submit an additional waypoint for the final location for the reviewer, just make sure you select the option to keep it hidden from the public.  Many puzzle caches will often state that the starting coordinates are bogus.  You don't have to, but putting a note at the beginning of the description that informs cachers that the starting coordinates are NOT bogus might help those cachers who are a little bit more hesitant to go after puzzle caches.  You can even add that it is an on site, kid friendly puzzle cache.  Even experienced puzzle cache ignorers are likely to say "Hmmm...let's check this out".
There you go.  You've just made a puzzle cache for kids.  While many caches can be found by kids, going that extra step to make a cache specifically designed for kids will earn you a notch among those cachers that take their kids out with them. I should also point out that this design could also fit into the category of a multi-cache.  I'd probably consider it a puzzle because you have to put together a puzzle to get the coordinates, instead of just having a piece of paper inside the first stage with the coordintes written on it.
I am currently working on using this design myself, but if any of you decide to put one of these out, let me know how it goes.  Do you have another idea for a kid friendly cache?  Scroll down to the bottom of this blog to see how you can send me your idea.
TripCyclone