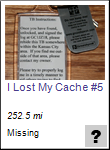
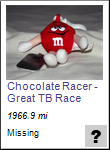
I promised to provide information on how to create Graphical Links for travel bugs as seen in my I Lost My Keys cache. Unfortunately, this will require some knowledge of HTML programming (a common programming language for building basic websites). However, my hope is that this article will help even the most HTML-illiterate geocacher. We'll start by showing you one of the Graphical Links from my I Lost My Keys cache.
There are four parts to this process:
- Have a posted Travel Bug photo on the Travel Bug page
- Identify travel bug reference number & GUID
- Prepare the HTML code
- Insert into desired page (whether profile page, cache page, or elsewhere)
- <a href=""> - This is the opening code for making a clickable link
- </a> - This is the ending code for making a clickable link
- <img src=""> - This is the code for posting a picture
And some extra codes that you can use:
- <p> - This is the opening code for a paragraph
- </p> - This is the closing code for a paragraph (using these separates the link from the surrounding text by adding a blank line before and after the graphic)
- <br> - This code is the HTML equivalent of hitting the ENTER key.
Click on "Upload an Image" to bring up another screen. From that screen, you can browse your computer to find a photo (I'll leave any editing to the photo up to you...just make sure the tracking number on the tag is not visible). Before you click the upload button, make sure you checkmark the box above it that is labeled "Make this the default image for this Travel Bug". This will insert the image into the travel bug page.
If you do not have a photo, but somebody has taken a photo and posted in their log, you can also use that (make sure they are okay with you doing that first). To do this, go to your travel bug page and on the same menu in the image above, click on "Edit this item". On the screen that comes up, there will be a box for the "Bug Image". Click on the arrow on the right side of this box and it will pull up a list of the images that have been posted that Travel Bug's logs. Click one, then click on "Submit Changes". Now you're travel bug has an image.
Step two...the reference number and GUID. One of these is easy, the other might seem hard...but it's not. Go to the travel bug page. The reference number is right at the beginning, at the bottom of the basic Travel Bug information at the top of the screen. It's even listed in bold. Write down the "Reference Number" for later.
Now let's find that GUID. The GUID is a 32 digit ID code. Every cache, every travel bug, every geocoin has one. It's really easy to find, but it seems like a lot of steps. Follow these instructions and you'll have it in only a few minutes. These steps should be very similar no matter what browser you are using. The only variation will be where the option in Step 3 is located. The instructions are for Firefox.- Go to the desired Travel Bug page.
- Go to your browser menu and click on "View"
- Scroll down and click on "Page Source" (this will open a new window with lots of programming language
- Hit F3 (this pulls up the search option)
- Type in "GUID", and hit enter or "Find" if needed. (Firefox will go straight to it as you type)
- Next to the highlighted "GUID" is an equal sign. Following that is a length of letters and numbers followed by a quotation mark. Highlight everything BETWEEN the equal sign and the quotation mark. Don't highlight those two symbols.
- Hit CTRL-C when it is highlighted (or click "COPY" in your browser's "EDIT" menu).
- Open up Notepad, or Wordpad, or something else to paste the text too.
- Hit CTRL-V in whatever program you open (or click "PASTE" in your browser's "EDIT" menu).
Now it's time to get the HTML code put together. We'll start with what the overall code will look like to give you a reference for how to alter it. The code will look something like this in the end, with a few differences to the parts in bold:
<a href="http://www.geocaching.com/track/details.aspx?tracker=TB2AF6Y">
<img src="http://img.geocaching.com/stats/tb.aspx?guid=91ae86a8-a75b-49e7-80a3-9cf73c269d92"
alt="" /></a>
Now for the update to make this work for your item. In the first line, delete the part that says TB2AF6Y and replace it with the "Reference Number" you wrote down. If I wanted to switch it to my Chocolate Racer TB in the above image, I would replace it with TB2AF6T (notice how it's the bold number at the bottom of the image).
Now let's alter the second line. As you might of guessed, this is where you will insert the GUID number you got earlier. Just erase the part in bold above and paste in the GUID for your item.
Your code is now ready to go. Remember the example of the final product I provided at the beginning of the article...here is what it looks like after changing just those two things:
<a href="http://www.geocaching.com/track/details.aspx?tracker=TB2AF6T">
<img src="http://img.geocaching.com/stats/tb.aspx?guid=c06abb70-7453-4286-9287-794e873aa7b1" alt="" /></a>
Which produces:
Time for the final step. After switching out the numbers above, copy the entire section of code. Now go to wherever page you want it displayed at. If on the Geocaching website, you'll need to "EDIT" the item, whether it's your profile page or the cache page. Just select on the part that says "Edit this ____". Since we are talking about this with reference to a geocache, the instructions are tailored to that approach.
On the cache page, you have the list of options on the right side just like on the Travel Bug page. Click on "Edit Listing" to pull up the page for altering your geocache. Scroll down to the "Details" part, where there will be two dialog boxes. One is labeled "Short description" and one is labeled "Long Description". Most likely, you'll put this graphical link into the Long Description part. Scroll through everything in this box until you find the spot in the text you want to display the graphic. Click on that spot and paste the code you prepared in the previous step. If you want a blank line before and after it, just add a <p> before <a href= and a </p> after the </a>. It should look like this:
<p>
<a href="http://www.geocaching.com/track/details.aspx?tracker=TB2AF6T">
<img src="http://img.geocaching.com/stats/tb.aspx?guid=c06abb70-7453-4286-9287-794e873aa7b1" alt="" /></a></p>
One last thing. Before you submit the update to the cache page, scroll up to the "Short Description" box. Just above that is a checkmark box that says "The descriptions below are in HTML". Make sure that you put a check in that box.
Now go hit submit. Check your cache page and it should have the graphic on the page. Congrats. You've just included a cool link to a travel bug. I like this for several reasons. It's more splashy looking. It displays the current location of the travel bug, and it displays the distance traveled. For the Locked Ammo can design, this is a great way for people visiting the cache page to quickly get an idea of which keys are in travel bugs (the graphic displays a box), and which ones are in the hands of geocachers (displays a smiling face).
Enjoy.
TripCyclone


2 comments:
Had a quick question about the difficulty rating of this type of cache:
If all four keys were to be placed in 5-5 caches (hypothetically speaking, of course,) and the keys are required items for the completion of the cache, does this affect the difficulty and terrain ratings of the cache itself?
I suppose not, you get credit for doing those caches in the process of getting this one, but the effort to get the key, it seems, should/could/would be reflected in the completion of this type of cache.
I wonder if there's a way to script out the average of the T&D ratings of the keys and graphically display this on the cache's page. Hmmm.
Tim, that's a good question. If the keys were placed in such a way, I would consider that when determining the difficulty. In my case, the TB's that have the keys are floating around random caches, so they kind of even out in the end.
Post a Comment