If there was ever a cache that everyone should try once, pict-o-caches would likely be near the top of the list. They take aspects of several different types of caches and join them together to make a cache that everyone can participate in and enjoy. But how do they work? First, we need to establish what they are.
Pict-o-caches are a class on their own. Taking cues from multi-caches, on-site puzzles, and visual puzzles, these puzzles definitely require an observant eye. Given a location to start at, you are basically guided through a multi-cache not by finding hidden stages with coordinates inside, but by finding things right out in the open. The clues are pictures. Follow the pictures and find the cache. It sounds simple enough.
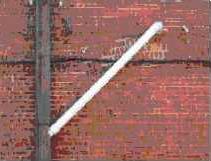
Let's look a bit closer. There are two basic methods of doing a pict-o-cache. For the first one, we'll use a pict-o-cache that I completed in 2008 with my friend 8601Delphinium. Both of us enjoyed this cache and thought it was a good example of this method. It is the Hastings Pict-O-Cache located in Hastings, NE, set up by Still Searching. In this method, you are given a starting location, usually the cache coordinates themselves. Standing in that location, you have to scan around the area. Somewhere, within your field of view, you would find this:
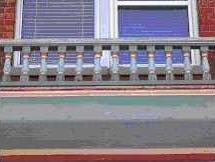
 Obviously, this image shows a brick wall, so you would want to scan for brick buildings. It could be on a building near to you or one in the distance, but it will be in your view. One thing to consider is whether the object is close to the ground or not. If you find a building in your view that has other objects masking it, like vehicles, bushes, or trees, you'll need to take that into consideration. Once you find the object in the picture, you need to go over to it. Stand next to it, and begin searching for picture number two:
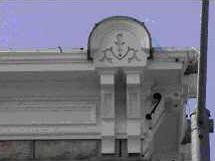
 Examining the photo, you at least now that it is near a window. Second, you can also guess that it is at least a second story window based on the ledge. Third, even though it also appears to be on a brick building, don't assume that it is the same building. So make sure to scan every building in your view. Okay, over there. That's the window. Let's move over to it. Time to find number three:
 Now, you can be certain that this is the corner of a building, and along the roof. Again, start scanning around, this time paying attention to roof corners that have this style of decoration on it. Wait...over there. Nope, it doesn't have the streetlamp object visible along the edge of the photo. But, if you look at that other corner of the same building, it does have it. Time to go to stage four.
This is the overall idea of this type of pict-o-cache. It's nothing more than following the pictures. These caches are great caches for group caching or family caching. Everyone can get involved with finding the images, including kids.
But I said that the above method is just one type of this style of puzzle cache. So what's the other method? For the other method, I'll use Krypto Kache, found in Omaha, NE. Set up by Team Kryptos, this one still has you looking for pictures, but this time you are given a list of coordinates for the pictures. This might seem counter-intuitive, but it's not. The coordinates are just a list of coordinates with letters assigned to them, and the pictures are numbered. Go to each of the coordinates and figure out which of the photos is found there. Match each coordinate to a picture and you'll get numbers for the letters. Then fill in the numbers in the provided final coordinates based on the letters and you'll get the final location for the puzzle. Go to that location and find the cache.
Either method provides an interesting caching experience. But, what if you want to make one? Before you do anything, you'll need a few things.
Materials Needed:
- Camera
- Photo editing software
- Notebook
- Cache Container
- Logbook
A notebook? That seems odd. However I would also recommend bringing a notebook to help keep track of note only the order of the photos, but to match the photos to coordinates and to write notes about the photos. Both of those last two will make sense in a bit. For a cache container, any size can be used. Just remember to make it appropriate for the location you use. Ammo can's are obviously not the way to go if this cache will be designed in an urban area. And regarding the photo software. Anything will work. GIMP is a good free software. It has a learning curve, but there are plenty of tutorials out there to help and it is quite powerful considering it is free.
For the first method, there's a bit more that goes into preparing this puzzle. Start by finding a place to hide the cache (and mark the coordinates). Many of the pict-o-caches I've seen are usually found in vibrant urban environments. Urban areas provide a lot of different options for photos that you just won't find elsewhere. Whether using architecture, window, window displays, vents, signs, lamps, etc., you should have a pluthra of objects to use for photos. "Historic Downtown" areas often make great spots. Out in a park, on the other hand, is not so great. You have trees, bushes, plants, trees, benches, lamps, trees...imagine looking at a photo of a tree then looking around you to find a hundred trees that all look like the photo. Case settled. However, that doesn't mean a park can never work for this type of cache, it's just harder to make it work.
Once you find a location, you have two options. You can find a random starting location and work your way along a path to the final location, taking pictures along the way. Or you can do the same thing, only working backwards through the route. Either way works, but it might be easier to visualize if you work your way forwards through the route. I'll describe the rest as if you are doing it forwards.
Find a random starting location and grab the coordinates. Then, scan around and find something to take a photo of. Remember, your path can be whatever you want, so don't feel like you have to always be getting closer to the final location. Also, your photo can be at a distance, or it can be closer to the object you want to photograph. Feel free to mix it up to increase the difficulty, just make sure that what you see in the photograph is at least big enough to see from the previous spot. Another way to increase the difficulty is use only a portion of the photo. For example, instead of using a photo of the entire statue, crop it so that you only see a small portion of it. This also helps to reduce the chances that someone spots stage nine and rushes straight to that spot in the puzzle before they've done stages one through eight. This is where the notebook can really come in handy, as you can write down notes about each image in case you want to mess with the images on the computer.
Once you have your photograph, move to whatever you took a photo of and stand next to it. Before you continue, make sure to grab coordinates. You will want to add waypoints for each picture when you list your cache online. This helps the reviewer in two ways. One way is to help them see what route you are having the cacher go. They may see something you hadn't thought of based on where those stages are that may require fixing. Second, each picture is techniqually a stage in a multi-cache. Multi-cache guidelines require posting the waypoints for each stage. Some reviewers may see it as a puzzle cache and not require the additional waypoints, but trust me that it will be appreciated. Some reviewers will actually require them for the above reasons.
After you have your coordinates, repeat the above process until you reach the final location. When you close in on the final location, think carefully about the last two photos. The last photo should be close enough to narrow down where the final location is within 10 - 20 feet (or about the typical accuracy of your GPSr). The second to last photo should get you close enough that the last photo makes sense. If the final location is hidden in the skirt of lamp post, and your final location is of the skirt, the second to last photo should not have eight lamp posts in the image. Figure out a way to narrow it down to no more than two, maybe three if they are closer together. You'll get complaints from cachers if you don't.
Now that you have all your photos, coordinates for each photo, and have placed the hide, you're ready to go home. At home, you'll need to take some time to get everything organized. Hopefully, you took notes of the coordinates for each photo and a description so that you can quickly match things up. Load up your images and start preparing them. I recommend numbering your final images so that you can get them arranged properly. Feel free to put a visible number in the photo to help the cachers as well. If they are printing off a sheet of images then the numbers will help them keep everything in order too. Once you do have them prepared, you'll need to do one more thing.
When you post this online, you'll have an easier time displaying the photos if you create an image file that has the photos arranged in order that can be displayed online. Check out both of the linked caches listed earlier to see examples of this. It will make setting up the cache page easier. Also, don't forget to create additional waypoints for each image. They can be hidden from public view if using the "follow the images" method, or they can be public if using the "match the images" method (you have to list the coordinates anyway for this one). Get everything ready to go and submit. As to the software to use for this, that may vary depending on your experience. This isn't needed, but it makes creating the cache page easier.
But what about that second method I described. You know, the one where you match the photos to the coordinates? This method has a bit wider range of options for where you can set it up as compared to the first method because you aren't following images to the hide, but matching images to get numbers in order to determine the final coordinates. Your images can be in a confined area of a few blocks or they can be spread out over a mile wide area. I've seen some spread out across entire communities. You just need to keep track of which images go with which coordinates. Find some locations with something you want to take a photo of and take several photos of varying zoom levels. You can also crop those as you see fit. Make sure you take coordinates of the spot you took the photo from. If using the notebook, take note of which coordinates go with which image. Keep doing this for the number of photos you want to use, then find somewhere to place the final cache.
Once you get home, make sure the photos are marked for identification. Numbers are recommended. Why? Because when you provide the list of matching coordinates, labeling them with a number might confuse people. Labeling them with a letter prevents this. And if you label with letters, you don't want to label the photos with letters too.
After cropping and marking the photos, and preparing the coordinates to match to the photos, you need to figure out how you want cachers to determine the coordinates. One way to do this is to make math equations. Write out a basic formula for the provided coordinates where certain positions equal certain letters. For example:
N 40° 35.189 W 098° 23.354
N 40° AB.CDE W 098°FG.HIJ
Then, for each picture, provide a formula, such as:
Photo A = (B+G)*(F-I)
As cachers match up the correct coordinates to each image, they use those coordinates to determine the value of each photo. Then they can plug those values into the final coordinates to determine where the cache is located at. Since this is done in the field, a coordinate checker isn't needed. Once they have the final coordinates, they can go after the cache to claim a find.
When submitting this design, it can be labeled as either a puzzle cache or a multi cache. If you aren't quite sure how to list it, contact your reviewer and ask for what they would like it listed as since they will be the ones approving it.
These two methods are the two most common methods I've seen, but there are probably other ways to set this up. I don't see Pict-O-Caches as often anymore, but I have seen a type called "Steeplechases" which are essentially method #2, but with a theme. Themed Pict-O-Caches can be fun too. While Pict-O-Caches aren't as common, I haven't met too many people who dislike them since they are a bit different and can be an interesting way to explore an area.
TripCyclone
PS: A thanks to reviewers *gln and Heartland Cacher for their input on how to submit a pict-o-cache and to Still Searching for letting me use some of the photos on his pict-o-cache. I probably SHOULD say thanks to Team Kryptos, but I didn't use any of their photos so they'll get a thanks for letting me reference their hide.


